Wednesday, April 29, 2015
Pruning Roses in Spring
Sunday, April 26, 2015
How to harden off plants
Discoveries
Look what I found growing under the huge lilac bushes.
Both colors of trilliums growing side by side.
And under another massive lilac: some dog toothed violets.
And I realized today that Deborah from Kilbourne Grove was right about my mystery buds. I should have known. I think they are the type of elderberry I had when we lived in Bognor. It's growing around the lilacs too.
I am so blessed with each new discovery and I am still in awe.
Growing Your Own Garlic in Containers
Does Garden Design Have a Future in these Times of Austerity
Yesterday the UK officially entered a double dip recession. The first in nearly 50 years. Led by the building industry, it’s predicted that this sector will remain in negative grown for at least the rest of this year.
With house building at an all time low, and Europe and America in the worst recession since the 1930’s, what will happen to the middle classes, that up till now have been the life blood or our industry?
Garden design as an industry, has had 20 years of unparalleled growth. Prices in the housing market have risen across Europe (and more recently America) at a staggering and in hind-sight, unsustainable rate.
It goes without saying that the housing market and the landscape industry go hand in hand. There have been housing market slumps before and the garden design industry has always recovered. But this time it could be different.
Countries like Spain and Ireland have huge housing estates abandoned like ghost towns, and parts of the US have deserted subdivisions, reminiscent of 1930’s dust bowl America, where thousands of acres of farmland where abandoned.
With house price crashes in some countries in excess of 50%, it’s going to take more than a generation to put right these wrongs and as a result, the middle classes are going to be squeezed very hard, for a very long time.
So what effect for the garden design industry? I believe it’s inevitable that the industry will contract. More people will be fighting for the smaller bread and butter jobs while the upper end will remain strong.
Those designers who are properly qualified, stand the best change of making a living. Charging professional frees and offering a professional service.
Fewer people will enter the professions; and those that do, will need to do their homework very carefully. Too many courses cater for the “ladies who lunch brigade”. They focus on the froth, rather than teaching their students the professional practice side of the industry.
The Oxford College of Garden Design took the decision last year to only offer our on-line course for the foreseeable future. Thus allowing our students to continue to work and earn a living, while they study.
“What most course don’t tell you is that it will take another 2-3 years after you graduate, before you will earn a living”
By pre-recording all our lectures and offering them as downloadable video tutorials student can continue to train while still bringing in a salary.
Too may student graduate, only to then drop out after 12 –18 months because they can’t afford to live.
If you want to thrive in the 21st century you need to think smart, plan ahead and have the best training you can afford.
Saturday, April 25, 2015
First Bloom of the Hellebores Seedlings
I expect that by next year there will be many more flowers all around the plant, and that later in the summer, even after the flowers fade, the leaves will create an impressive shiny green mound.
Other flowers that are showing now are grape hyacinths and daffodils,
Asparagus Ferns and Diapers!
 them out of their pots. I get out my trusty root knife and start to work on them. I usually divide my hanging basket ones into three divisions or clumps and plant them in separate containers or share them with friends.
 sable baby diapers! The liners of baby diapers can hold a bunch of water, they are cheap and light weight. I usually cut them in half, cut through the elastic leg openings to make them lay flat. Now I lay them in the bottom of my fiber pots, cover with a few inches soil. I used two diapers in the one pictured at right.
Cheap and Simple Seed Starter Cups
 Most of my readers know how frugal- translate that cheap! Since I grow and transplant hundreds of tomatoes and other small plants, my container expense was climbing. I have small groups of folks over to my house every other week and we have snacks - I use the tall plastic cups to keep from washing dishes. They are just the right size to pot up my tomatoes for sale in! I used an ice pick to put holes in the bottom and a black permanent marker to write the variety on top!
 Top 50 UK Spring Gardens
1 Achamore Gardens, Argyll
2 Annesley Gardens, Co Down
3 Antony Woodland Garden, Cornwall
4 Batsford Arboretum, Gloucestershire
5 Benmore Botanic Gardens, Argyll
6 Broadleas, Wiltshire
7 Broadleigh Gardens, Somerset
8 Brodie Castle, Nairn
9 Burncoose Gardens & Nurseries, Cornwall
10 Caerhays Castle, Cornwall
11 Chesters Walled Garden, Northumberland
12 Coleton Fishacre, Devon .
13 Docton Mill, Devon
14 Dorfold Hall, Cheshire
15 Dudmaston Gardens, Shropshire
16 East Bergholt Place, Suffolk
17 Easton Walled Gardens, Lincolnshire .
18 Exbury Gardens, Hampshire
19 Fairhaven Woodland and Water Garden, Norfolk
20 Felley Priory, Nottinghamshire
21 Galloway House Gardens, Dumfries & Galloway
22 Gresgarth Hall, Lancashire
23 Guy Wilson Daffodil Garden, Co Derry
24 Hergest Croft Gardens, Herefordshire
25 Hever Castle, Kent
26 Hodnet Hall, Shropshire
27 Howick Hall, Northumberland
28 Inverewe, Ross-shire
29 Kingston Lacy, Dorset
30 Leonardslee Lakes and Gardens, West Sussex
31 Littleham House Cottage, Devon
32 Marwood Hill, Devon
33 Mount Edgcumbe Gardens, Cornwall
34 Muncaster Castle, Cumbria
35 Nymans, West Sussex
36 Penjerrick, Cornwall
37 Plas Newyyd, Gwynedd
38 RHS Garden Wisley, Surrey
39 Rowallane Garden, Co Down
40 Rydal Mount, Cumbria
41 Savill Garden, Berkshire
42 Sheffield Park Garden, East Sussex
43 Sherwood, Devon
44 Sir Harold Hillier Gardens, Hampshire
45 Spinners, Hampshire
46 The Garden House, Devon
47 Ulting Wick, Essex
48 Valley Gardens, Berkshire
49 Wentworth Castle, South Yorkshire
50 Westonbirt Arboretum, Gloucestershire
Friday, April 24, 2015
How to Survey a Garden Pt.3
Gathering Additional Site Information
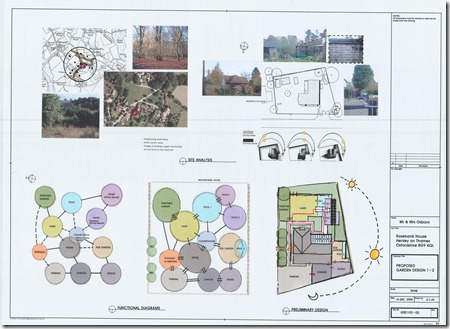
The designer should photograph the site extensively as a reference for what already exists. Don’t just take landscape shots, but also reference photos of features such as: steps, drains, oil/gas tanks septic tanks, boggy areas, banks, overhead cables, shots from upstairs windows, showing an aerial view of the garden and its neighbours. In short, you can’t take too many photos. These may also one day be useful as ‘before and after’ pictures, if the garden is published in a magazine, so don’t throw them away afterwards!
Other sources of information are also important and should be considered. In some countries the client is legally responsible for supplying services information such as the route of electricity, water and drainage. If this is the case you need to inform them in writing so they are aware of their responsibilities.
You may still need to obtain this information on their behalf and you would do this by contacting the service providers directly, who should have a record of where pipes and wires enter and leave a property.
Other information can be obtained from:-
1. Old architectural house plans: These can contain a survey of house to include position of doors and windows. Scale plan of site. Position of outbuildings etc.
NB. Never take existing survey information as gospel, as it will need verifying with your own survey.
2. Local Deeds: May contain information on boundary ownership,(which neighbour owns which fence) Public rights of way etc.
3. County Engineer: (Same as above)
4. Local District Council: Different countries have different planning laws please research your local planning restrictions. TPOS (Tree preservation orders, contact the tree forestry officer) Planning enquiries Local planning officer, planning permission for outbuildings/conservatories etc. Queries on land use Enquiries on any special local planning legislation Further information on planning will be covered in GD1207
CHECK LIST FOR SITE SURVEYS
In addition to the previous 4 categories; the other site information you need can be divided into 3 categories
Physical Aspects (natural)
1) Geology underlying rock
2) Soil pH(acid/alkaline)
Texture (sand/loam/clay)
other (chalky/stony/peat)
3) Topography physical location of site
4) Drainage surface water
(flowing/standing)dry/damp areas
5) Climate wind movements prevailing wind turbulence
air movements (frost pockets)
shelter/exposure
sun/shade (daytime/seasonal variations)
atmospheric pollution
6) Vegetation trees/shrubs (size, density, age condition indicator species)
7) Fauna evidence of any wildlife
Cultural Aspects (man-made)
1) House style, age, materials, unique features
2) Structures type, size, material, condition
3) Access vehicular/pedestrian (general circulation)
4) Services electricity/gas/water(position, line, size)
5) Legal land ownership, rights of way, fire access tree preservation orders
Sensory Aspects (perceptual)
1) Character uniqueness of site (house/surroundings)
2) Views without (type, extend, position significance)
within (sequence of views and spaces)
visual barriers (limits to view)
visual effect of site from surroundings
3) Privacy overlooked/enclosed (boundary
effectiveness
4) Other noise, smell, tactile qualities
IMPORTANT: I have already mentioned at the start of this lecture that a site survey could be considered a legal document and if incorrect, could cause great upset and may even land you court. One of the ways to minimise the risk of incorrect measurements is to make sure the following wording appears on all your drawings:
All dimensions must be checked on site and not scaled from this drawing
The designer must always be careful not to misinterpret what may appear to be an obvious boundary line. The actual location of the property/boundary line is essential. If there is any doubt, always get the client to sign off the survey to say they believe it to be true and accurate or get a qualified land surveyor to carry out the survey for you.
Surveys are not hard to do and in 99% of time are very straight forward so don’t be scared about taking this on, but just be away that on the odd occasion where perhaps a fence is missing or has fallen down you may be better off getting someone else to do it for you.
Microclimates: How To Change Your Garden's Climate
While King Canute the Great, might not have been able to stop the tides, you may be surprised to know that you can change your climate….well at least to a certain extent!
You can improve and control the climate conditions within your garden by creating ‘microclimates’ for particular areas or groups of plants.
While you can’t control your countries regional climate, within that region, exposure to sunshine, wind or rain, makes weather considerably different from one garden to another. Open hillsides facing south get more sunshine than gardens hemmed in by buildings, hilltops are windier than valleys, and gardens along the banks of rivers or lakes suffer more fog than those only a short distance away.
These geographical differences combined with some clever planning by ourselves, create the individual ‘microclimate’ of our gardens or even for individual planting beds.
Understanding Heat
Heat comes from the sun rays that warm up any surface they strike. Water is partially transparent to sunshine, so that the benefit of heat is spread over a large volume of water, raising its temperature very little in a short period. Glass, when clean, is almost entirely transparent to sunshine and it’s the objects underneath glass that warm up, rather than glass itself. Other materials heat up according to the materials of which they are made, and some of the best absorbers of heat in the garden are brick, paving stone and bare soil.
Although the sun is by far the largest source of heat, everything on earth is also a radiator in its own small way. On a sunny days, no sooner have objects acquired heat from the sun, they re-radiate some of that heat, for the benefit of anything nearby which hasn’t done so well. Hence a south-facing patio and house wall, will be a definite hot spot on a sunny day because of heat radiating from the surfaces. Also vegetable widely spaced in weed-free soil, will enjoy a warmer microclimate than a crowded flowerbed in a lawn.
Conduction & convection
Heat can also be distributed by conduction, through brick, downwards into soil and, particularly important, to the air that lies in contact with heated surfaces. Air so warmed, becomes lighter and rises upwards to be replaced by colder air from above which then warms in turn. Gradually warmed air spreads throughout the garden by this convection method, even circulating to areas receiving no direct radiant heat from the sun. On cloudy days, air temperature is pre-determined by its past history and the amount of heating it has received in other parts of the world.
Temperatures are similar throughout a garden, except perhaps for special very small areas. A chimney- breast wall can provide a favoured microclimate for a bush whose buds tend to get nipped by late spring frosts. It doesn’t hurt so much to lose expensive heat from indoors through brick if you can use it to benefit the garden. But for the best result in creating a warm microclimate at that spot you must trap the heat under a polythene cover or lean-to, otherwise wind - which is only moving air - will whip it away before it accumulates.
Evaporation & water Loss
Wind is a thief of moisture as well as heat. All air contains water vapour, the actual amount depending upon whether its stock has been replenished by journeying across the sea or kept short by travelling across large expanses of land. At any particular temperature air has a maximum possible capacity for vapour and this capacity increases with rising temperature. Moreover, so long as its vapour content is under capacity, air is thirsty for more and drinks from whatever source it can find - washing on the line, soil, or the leaves of plants.
Hence rising temperature on a sunny day, or an inherently dry air stream which come from the east, are both likely to denude a garden of moisture and it may be necessary to act the rain-god and alter the microclimate by artificial watering. The same necessity occurs on even a cloudy day, if a strong wind, damp or dry, is blowing. That merely means that a great deal of air is passing very quickly and taking lots of gulps of moisture in the process. A strong wind is a blessing to dry out soil after a rainy spell, but in drought conditions it makes already bad conditions worse.
Wind Protection
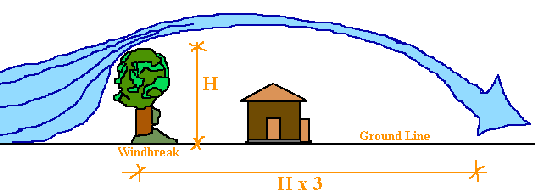
If you add to these characteristics of wind its sheer brute strength and battering power, protection against it can be seen as a major objective in modifying the microclimate of a garden. Secure staking helps, not because it actually makes a garden less windy but because it tricks plants into thinking it is less windy by giving them extra strength to resist! The trouble is that wind cannot be stopped, only diverted. When it comes across a row of houses with passageways between, it funnels into the constriction and comes out of the exit with increased speed, rather like water forced through the nozzle of a hosepipe.
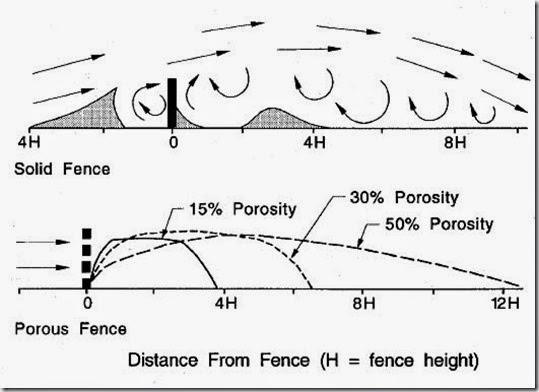
If wind encounters a wall, it either goes round the corners or over the top, giving increased speed in those areas because extra air is crowding through. Moreover, wind eddies backwards in the relatively ‘empty’ space on the leeward side, sometimes with as nasty effect for plants situated there as if they had received the direct blast of air. A hedge or permeable fence gives better wind protection because it allows enough air through to prevent the eddy space behind, yet breaks the initial force of the blast.
Wind barriers
The choice of site for a wind barrier may be obvious, like the end of a passageway which runs in the same direction as the most frequent winds. Or it may involve a difficult choice between incompatible factors. In Britain the coldest winds come from between north and east, the most drying winds from between north-east and south-east, gales come in any season from any direction but mainly from the western half of the compass. Damaging salt-laden winds in coastal gardens come from whichever direction faces the sea. You can’t protect a whole garden from every direction unless you risk undue stagnation of damp air in wet seasons.
Coastal gardens have little choice and must protect against onshore wind, even if this means some deprivation of sunshine in western and southern districts. Gardens in the middle of such coastal towns possibly have enough buildings between them and the sea to act as a preliminary barrier and have too great a need for sunshine for you to dare erect another barrier except against cold north winds. East coast gardeners in the UK have less heart-searching to make because by protecting against north and east winds they deal with both the cold, the dry and the salt winds without detracting from their quota of sun.
Glass as a barrier
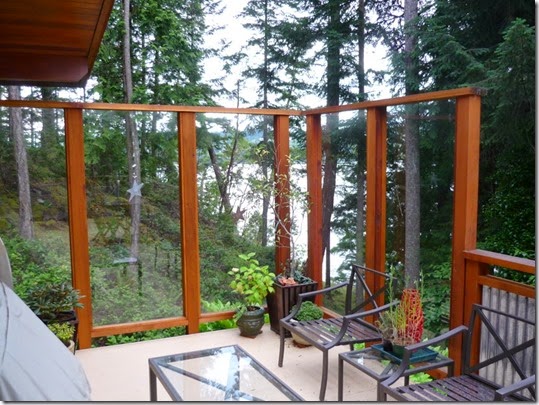
The ultimate protection against wind is a glass wall, but remember that if the wind blows in the same direction as a line of cloches the upwind end must be firmly closed to prevent air funnelling through. Moreover, if it is windy and sunny a watchful eye must be kept for the ‘greenhouse effect’ on air temperature. Air beneath the glass warms on contact with the heating surface of the ground, and if none can escape the same air gets heated over and over again and air temperatures and moisture evaporation rate increase very rapidly.
Such excessively hot microclimates have killed dogs left in parked cars in the sun and can easily cause the collapse of plants. Some ventilation is essential, and perhaps an opaque wash over the glass as well would help the atmosphere in high summer.
Walls for protection
Although it is relatively easy to make the microclimate of a garden wetter than the general weather pattern ensures, there is little that can be done to prevent excess water in a rainy season except by enclosure and substituting artificial watering for rain. But it is helpful to remember that walls give considerable protection against rain unless it is driving straight onto the wall, and therefore beds alongside walls have different microclimates on all sides of a house.
A wall facing south-east strikes a happy compromise between adequate sunshine without excessive rain, but the soil beneath may need topping up with water even in a very wet season. North walls are always very dry, though curious things can alter the microclimate even there. For instance, if you have plants under an overflow pipe, they will flourish better than the others because of their built-in ‘rainfall’.
If you would like to learn more about Landscape & garden Design why not consider taking our One Year postgraduate level Diploma Course click here for details
Wednesday, April 22, 2015
Treating Fireblight
Fire blight can be spread by insects, wet spring snow and rain and by pruning practices. If you’ve seen infected trees in your neighborhood, you should spray your trees to help them disease free. Apply streptomycin when blossoms first open and weekly during the bloom period. Streptomycin can be found in Fertilome Fire Blight Spray. If your tree is already showing Fire Blight symptoms, it is still important to apply streptomycin. In addition, you may prune infected branches in the spring, but it’s important to disinfect your pruners between each cut or you will spread the disease down the branch. Select a point on the branch 10" to 12" from the point of infection. Make your cut, then dip your pruners in a bleach solution or spray your pruners with a household disinfectant. Another option is to put off pruning until the tree goes dormant in mid-winter. At this point, it will be easier to see the infected branches, pruners don’t have to be sterilized and the chances of spreading the disease are minimized. For a positive identification on fire blight, bring a sample to the Diagnostic Center. We’ll answer your questions and show you how to apply Fire Blight Control.
Sunday, April 19, 2015
Backyard Camillias
I've written about my Camilla's before but this year they have outdone themselves. I honestly don't know why they have all bloomed so beautifully this time. I didn't do anything different and our winter was average. My early pink one bloomed in late December and the one above has been blooming since the end of February and it is nearly the end of April now. It is very happy in it's shady, moist location -near central heat and air unit and gets condensation from that.
 This pink and red stripe had two very different blooms on the same bush. Most all were true to type but I had one solid red near the bottom.
Look at the big fat bud on this red bush. It's blooms are even beautiful when they fall to the ground!
Camellia flowers stay a long time in a cut arrangement too. Look how pretty this one is.
All my Camellias are winter hardy varieties that can take our cold temps here in the upper south. It got down below 20 degrees this winter. They are all planted in sheltered places or under large trees and I leave the fallen leaves as ground cover until late spring. I think that gives them a little extra winter protection. I'm trying to propagate some from stem cuttings. I'll report on how that goes when I see the results.


