Saturday, February 28, 2015

Houseplant Varieties Site Map

African Violets
Aloe Vera Plants
Amazon Alocasia, Elephant's Ear
Anthuriums
Areca Palms
Arrowhead Vine
Asparagus Fern
Bird of Paradise
Boston Fern
Bromeliads
Cast Iron Plants
Chinese Evergreens
Chinese Fan Palms
Christmas Cactus
Corn Plants
Croton Plants
Dallas Ferns
Dieffenbachia (Dumb Cane)
Hawaiian Tis
Heart-Leaf Philodendrons
Fiddle Leaf Fig
Flame Violet
Goldfish Plant
Jade Plants
Kentia Palms
Lady Palms
Lipstick Plant
Madagascar Dragon Tree
Maidenhair Fern
Majesty Palm
Miniature Rose
Neanthe Bella Palm
Norfolk Island Pines
Orchids
Peace Lily
Persian Violet
Phoenix Palms
Piggyback Plants
Poinsettias
Polka Dot (Freckle Face) Plants
Ponytail Palms
Prayer Plants
Rubber Plants
Sago Palms
Scheffleras
Shamrock Plants
Snake Plants
Spider Plants
Split Leaf Philodendron
Help With My Split Leafed Philodendron
Staghorn Fern
Wandering Jews
Warneckei
White Cloud Ficus
Yucca Houseplant Care
Zebra Plants
ZZ Plants

Houseplant FAQ Guides
African Violets FAQ
Aloe Vera Plant FAQ
Areca Palm FAQ
Bird of Paradise FAQ
Corn Plant FAQ
Croton Plant FAQ
Dieffenbachia (Dumb Cane) FAQ
Heart Shaped Philodendron FAQ
Jade Plant Care FAQ
Kentia Palm Care FAQ
Articles
20 Common House Plants
Favorite Houseplant Books
General Houseplant Lighting Guide
General Houseplant Watering Guide
Easy To Grow Houseplants
Best Houseplants For Absorbing Air Pollutants
Poisonous Houseplants
Top Bathroom Plants
Houseplants Require Time
Wow! 20ft Dracaena Corn Plant
Energy Drink For Plants?
15 Awesome Secret Indoor Gardens - Truly Amazing!


Boxing Day Blizzard


We got quite a wallop of snow on Sunday! At first, the forcasters were saying only eastern Long Island would get a few inches of snow. But as Christmas Day drew to an end, the news was reporting that all of New York City and Long Island should expect for a blizzard with lots of snow and wind. So all day Sunday, we listened to the howling winds blowing 40+mph and watched the beautiful snow fall, and fall, and fall until we got nearly 2 feet of snow. The storm even blew snow onto the wreath on my front door (and it's covered by a porch!):

 
But the birds were not deterred. They held onto the feeders through the snow and wind, trying to get something to eat. I was just happy that I remembered to fill them the day before the storm.


And even though the weather outside was frightful, it sure was beautiful to watch the snow coming down. And my kids enjoyed a day in their pjs to play with their new toys!


Re-Potting African Violets

Our Front End Manager Jeanette shows us step by step how to re-pot a gorgeous and prospering African Violet that Head Cashier Corinna has brought in from home! Follow these steps, and as always if you have any questions don't hesitate to call us or stop on by!


First here is a picture of the mother plant. Notice how many leaves are coming off of this plant, and how small the pot is.  It is growing well and ready to be split and re-potted.


As you can see here if you look beneath the larger leaves you can see smaller leaves starting to come up.  This is a sign that there is more than one crown of the plant, and therefore can most likely be split into numerous plants.


Next, Jeanette demonstrates to you what two separate crowns looks like. If you look in the middle of the plant, centered between her thumbs you can see where the stems are coming from two different bunches, or crowns.  You can sort of tell that they have two different root systems going.  This is where you split the plant apart.


Alright, she has them split.  These are two of the baby plants, there is also a third plant which is the original mother plant.


Here is a closer look at one of the baby plant's root systems.  You can see that they all lead down to one root bunch and can be easily re-potted.


This is one of the baby plant's all potted up.  There are a few things to remember when potting up the baby plant.  For starters you want to make sure that you plant it fairly deep in the soil.  Wherever there is a "wound" where it was disconnected from the mother plant should sprout another stem.  The other thing is that you don't want to pack the soil around the violet.  African Violets like their soil fairly loose, and it will be easier for the plant to re-root in loose soil.


There you have it the mother plant posing with it's two new baby plants!


During the process of re-potting you will most likely have several stems of leaves that fall of, and have no roots.  If you would like to go further and take those leaves and try to root them, Jeanette shows us a few different ways!


The first one is a little bit tricky, but with practice it is quite effective! Flip the leaf upside down.  Take a sharp scissors or exacto knife and cut each vein on the leaf once.  Cut into, but do this without cutting through to the other side of the leaf.  


Then place the leaf face up in some soil, so that the cut veins are touching the soil.  Place it in a small greenhouse setting, and keep the leaf very moist.  Then each place that the vein was cut, a new root system will grow!


Another way to root the leaves is to take a sharp scissors or knife and cut a slit in the exposed or "wounded" end of them stem in a criss-cross pattern.  Then you can put the stem in a vase with water, and it will grow roots from each one of the four pieces.


Here are the four pieces coming off of the stem.


Well there you have it, several great ways to re-pot, split and root your African Violets!  Even though it is a little bit harder to do the method of rooting where you cut the plant veins Jeanette does suggest this way.  While rooting stems in water is easy, the plant loses a membrane in doing so.  This means the plant is going to have a little bit harder time rooting and growing strong once it is placed into the soil.

We hope this helps, and please feel free to ask us questions!  You can leave a comment on this blog, call us, stop in, or even leave us a Facebook message!


CSU Fruit Growing Symposium

Ann, our Perennials Manager here at The 'Bin attended a the Front Range Fruit Growing Symposium this last weekend.  The staff here at The 'Bin continue to take classes and stay up to date on the most recent horticulture trends and developments, so we can continue to be experts in our field!  Take a look to get a brief idea of the things Ann got to learn about this weekend.  Have a question for her?  Feel free to shoot us a Facebook message, call us or stop in today!

In Ann's words...


FRONT RANGE FRUIT GROWING SYMPOSIUM
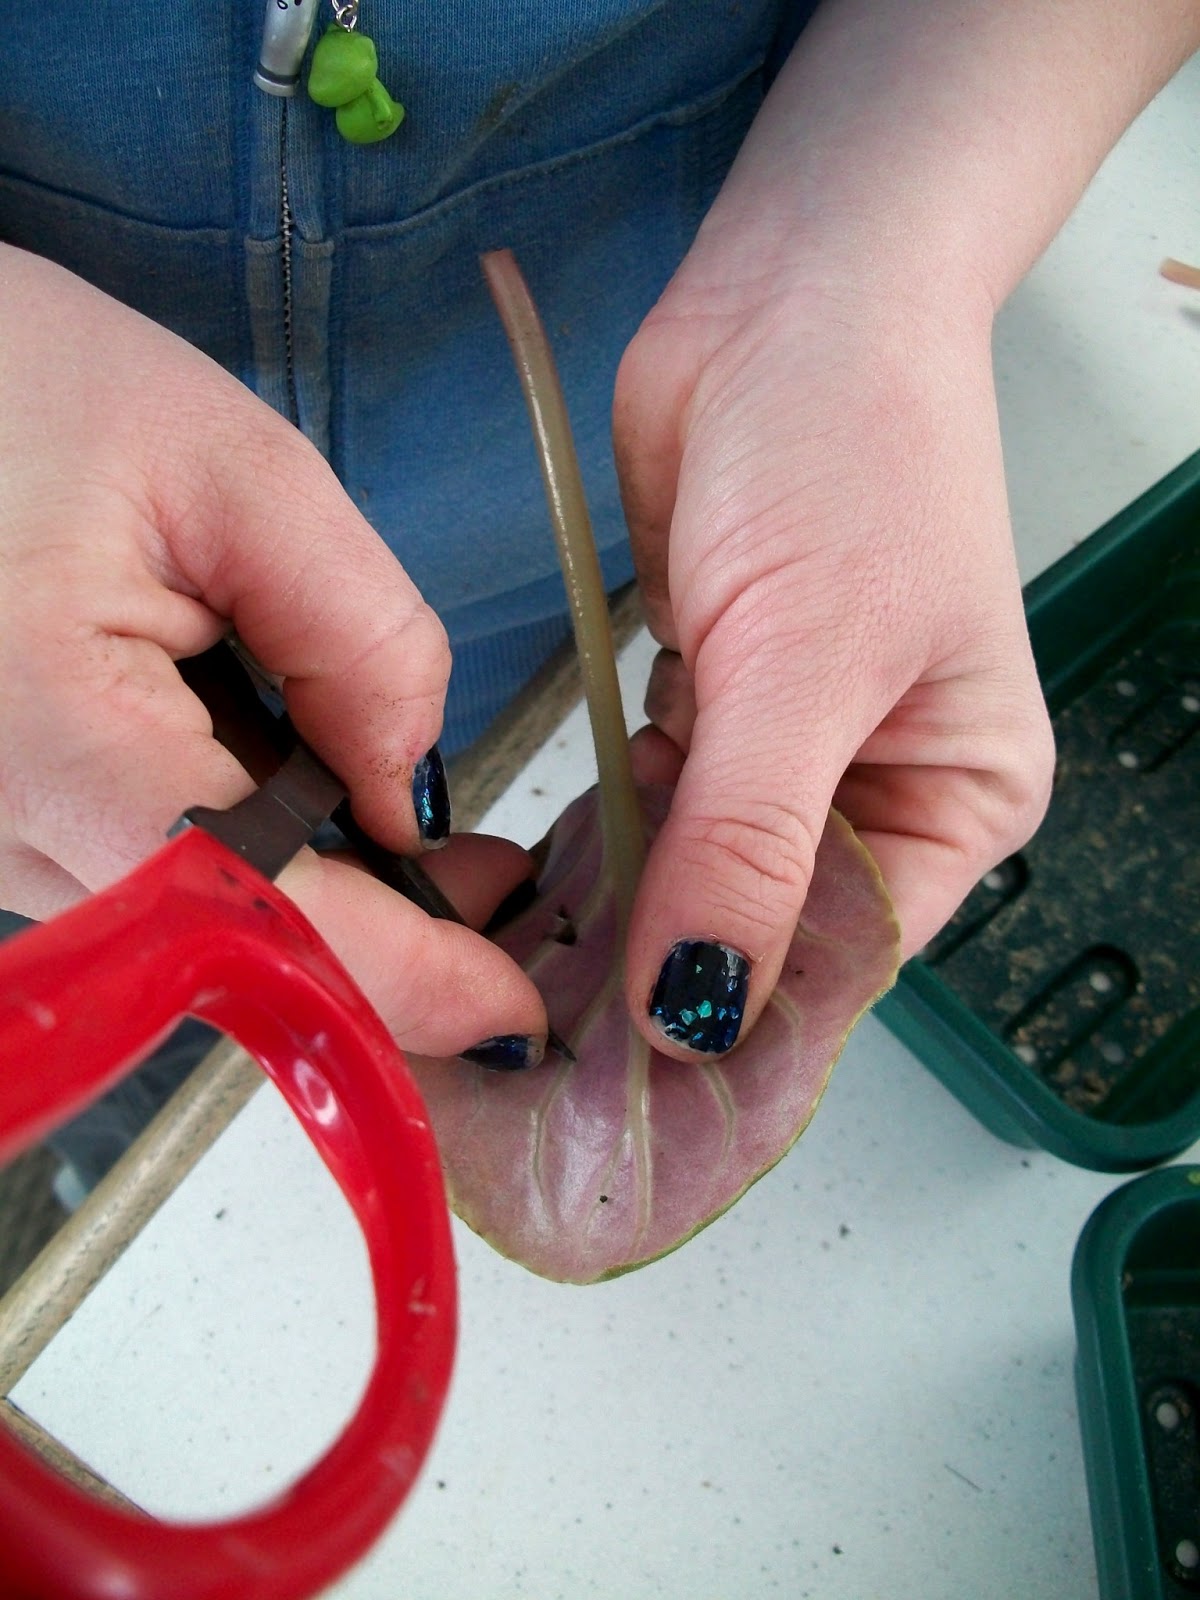
Last weekend, I went to The Front Range Fruit Growing Symposium. It was held at Silver Creek High School, and organized by Dr. Joel Reich of Colorado State Extension – Boulder County, and sponsored by: Nourse Farms and Cummins Nursery, (plant suppliers), Mad Greens (donated an excellent lunch), and Sprouts (refreshments and snacks). There were 1 ½ days of presentations and a ½ day apple grafting class.  It was aimed at all levels of fruit growing enthusiasts, from someone with one tree in their yard to commercial growers.
Speakers included:  Walt Rosenberg of Masonville Orchards, with multiple sites on the Front Range, Tim Ferrel of Berry Patch Farms in Brighton, Pete Tallman, a local berry breeder , specializing in Black Raspberries, Scott Skogerboe, Head Propagator of Ft. Collins Wholesale Nursery, Irene Shonle of CSU Extension -Gilpin County, Harrison Hughes from the CSU Dept. of Horticulture, Joel Reich from CSU Extension-Boulder County, Whitney Cranshaw of CSU Dept. of Bioagricultural Sciences, Andy Hough, Director of Agricultural Resources-Douglas County.

Wow! What a fabulous program it was! If you’d like to have a look, most of the handouts and slides are online at: BoulderCounty Extension - Horticulture Classes & Events
Walt Rosenberg of Masonville Orchards, and Tim Ferrel of Berry Patch Farms spoke about the challenges of growing fruit in our climate, and the hazards of running an orchard business.
Pete Tallman spoke of his 20 year adventure of finding, developing, and patenting, a first year fruiting, 


primocane, black raspberry called ‘Explorer.’

Scott Skogerboe, Head Propagator of Ft. Collins Wholesale Nursery has an amazing hobby, researching, and propagating ancient apple varieties. He has resurrected Johnnie Appleseed’s last living apple tree, and the tree that “inspired” Isaac Newton’s ideas about gravity, among others. These pieces of history live on, though not too available commercially. His talk was titled “Eat a Piece of History:
Growing Historic Fruit Trees in Colorado.”

Irene Shonle, of CSU Extension -Gilpin County, spoke about native plants and the quality of their fruit. Serviceberry, Golden Currant, Buffaloberry, etc. wild strawberry…. and what not to eat!
Harrison Hughes from the CSU Dept. of Horticulture and Joel Reich from CSU Extension-Boulder County, added sources of more information and opportunities to have hands-on volunteer adventures in orchards and vineyards. Dr. Reich also showed us examples of pruning techniques to promote fruit production on apples and peaches.

Andy Hough, Director of Agricultural Resources-Douglas County spoke about ongoing research occurring near Franktown on field and high tunnel production of fruits and berries.


Whitney Cranshaw of CSU Dept. of Bioagricultural Sciences came with lots of bug slides, and great enthusiasm for the infestations that he promotes in his own yard….so he can get those slides! Dr. Cranshaw’s slides and handout are at:

We did have one speaker who couldn’t make it due to the weather, it snowed, remember, yahoo!       This was our new Fruit Specialist from CSU, Amaya Atucha. Her handout is on the Boulder County Extension page above.

Now, our county Extension Agents have a wealth of information for you, too. Besides these handouts, there are webinars, and lots more!


~~~~~~~~~~~~~~~~~~~~~~~~~~~~~~~~~~~~~~~~~~~~~~~~~~~~~~~~~~~~~~~~

Thanks for taking a peek...like we said earlier, don't hesitate to contact us for further questions!

Spring Flowering Trees

All around me, the trees are in full bloom. Shades of pink and white are lining my street and filling the air with a sweet scent. And while trees are beautiful to admire from across the street, my favorite vantage point is right next to the trunk, looking straight up. 

The Bradford Pear tree has clusters of small white flowers and a lovely sweet scent. 

I just love the pink flowers against the burgundy leaves of the Plum trees. 

The Saucer Magnolia tree usually blooms before the others, but this year, everything is a little off because of the long cold winter we had. Truly a magestic tree in full bloom. 

I was lucky enough to have inherited this tree when we bought our house. I'm not sure how old this Weeping Cherry tree is, but it's no youngling. Filled with small, dainty flowers on long, cascading branches, it sways quietly in the breeze and is simply gorgeous. 

So next time you see a tree in bloom, get right up under its canopy and look up. It's a view that won't disappoint. 

Plant / Gardening Advertising Opportunities

Promote your plant or gardening products to the visitors of the Houseplant Care Tips Blog


Contact Me

Are you looking to reach the plant and gardening audience? Promote your plant or gardening product on a targeted web site devoted to Houseplants. Visitors of the Houseplant Care Tips Blog are looking for information on, or are looking to buy plant and gardening products. Put your product in front of your audience and all them the chance to buy or find out more information about your plant or gardening product with either Text or Banner advertising opportunities.

Site Stats
3,500 + Daily Visitors
Average Monthly Visits in 2012: 120,933
217,000 + Page Views Per Month
And Growing!!!

Advertising Opportunities Available

Banner Advertising
1) Advertise on the Top Right Hand Navigation with a banner no larger than 160(h) x 190(w).

Pricing:
1 Month - $85
3 Months - $225
6 Months - $400

2) Advertise on the bottom of every post with a banner no wider than the column. Banner would be located directly after the following buttons:

Pricing:
1 Month - $100
3 Months - $250
6 Months - $500

Text Link Advertising Options

1) If your company or product directly relates to a post, purchase a direct link to your site after a post for a one time fee of $50.00, it will not expire! So after a potential customer has read the care guidelines for a plant, you can give them a chance to either buy or find out more information directly from you!

2) Advertise on within left or right navigation. Purchase a direct link to your site. This link would be displayed on every page of the site. Links would be displayed on the left hand side navigation above the “Houseplant Archives” links. For a right navigation link, your link would be displayed directly before the Breast Cancer and Literacy Site Images. Space is limited to one line. Direct link price is a yearly fee of $150.00.

Please contact me for any questions, clarifications or other advertising suggestions.

Diseases in the Vegetable Garden

Just as the garden is always evolving, so too are the gardeners. This was my first year with an actual vegetable garden and I learned a lot. My beets never grew, carrots need more space and the zucchini needs a trellis. But the biggest lesson was to buy disease resistant plants. I thought about this is the beginning of the season, but in my rush and excitement to get my garden growing, I planted things that just looked good to me. 

Now, in late August, my cucumbers, tomatoes, string beans and snow peas are infected with a fungus. 


Last week I sprayed everything with an organic anti-fungal spray and though the plants look slightly better, I am not confident they will make it. 

Well, lesson learned. I will be sure to do a  good clean up in the next few months and remove the diseased plants completely. And next year I will do my research early and plant disease resistant varieties. 

GROW YOUR OWN MEYER LEMONS FROM SEED

I look forward to December every year not only because of Christmas but because our local grocery has Meyer Lemons for sale.

They are a real treat for us tea sippers and lemon lovers. Nothing beats the tangy Orangey/lemony taste of a Meyer lemon. Last year I saved seeds from one and planted it in the spring. I was rewarded with this little seedling. You can grow one too - no matter where you live.

Look for Meyer lemons in the produce isle and my store has them in a separate area from the other lemons. Meyer lemons are bigger than normal lemons and much juicier.

Save the seeds that you will find near the center of each lemon. Some of them have lots of seeds and some only a few.
Rinse the seeds and allow them to dry. Store them in a little container until ready to plant. I put them in a small pot of regular potting soil, cover with about a quarter inch of soil and keep moist until you see the little seedling. Keep it moist and warm and it should grow for you. Remember these are tropical plants so be prepared to winter them over inside if you are above zone 8. If you are lucky enough to have a greenhouse that's perfect. I have grown several types of lemons from seed and I winter them over in my little greenhouse. One is pictured below. It doesn't get below 40 degrees in there so they make it through the winter just fine. A sun room or brightly lit window will work too.

2 year old lemon in my greenhouse
As you can see in the picture above, my little tree is small but happy in the tall pot I planted it in. As it gets bigger, I'll move it up to a larger container. I'm not sure how long it takes for it to bloom. Probably three or four years - I can hardly wait. My friend bought a tree from a local garden center. It was EXPENSIVE and full of blooms. she said every bloom fell off about a week after taking it home. I think one of two things probably happened; she went from cool greenhouse atmosphere to dry house. A humidifier or steamer may have helped. Some plants simply don't like to be moved and will drop blooms and leaves due to shock. If that happens just water it sparingly and wait. They will usually recover and put out new leaves. Keep it happy and you should have blooms the following year.


Mike's Fabulous Fudge

I belong to a garden forum that that been a huge help to me as I grow my little Mimi's Greenhouse business. The forum is one of Mike McGroarty's http://www.freeplants.com/  offerings. Anyone can subscribe free to the newsletter and it is chock full of good gardening tips and information. This year as a Christmas gift to all the subscribers Mike sent us this video and recipe for his Dirt Farmer Fudge. I copied the recipe from Mike's sight for you and below is the link to his video of how to mix it up. I think you will get a kick out of the video.

http://www.mikesbackyardnursery.com/2012/12/mike-mcgroartys-dirt-farmer-fudge/

Dirt Farmer Fudge

Okay, here are the ingredients:

6 cups of sugar
1 and 1/3 cup of Hershey's cocoa
1/4 teaspoon of salt
3 cups of milk
2 teaspoons of vanilla
1 and 1/2 cups of smooth peanut butter
1 stick of butter or margarine
1/2 to 3/4 pound of walnuts halves

1. Mix all of the dry ingredients in a large sauce pan, at least 4 quart. When you boil the fudge it rises a lot, so use a big pan.

2. Pour in the milk and mix it with the dry ingredients. It won't mix well until you start to heat it, but mix it the best you can.

3. Place over medium heat and stir constantly until it comes to a bubbly boil. Once it starts boiling you can stop stirring.

4. While the fudge is boiling grease a 9" by 12" glass dish with butter. Get the rest of the ingredients ready. You'll add them to the fudge as soon as you remove it from the heat. Layout a hot pad for the hot pan when it comes off the stove.

5. It's a lot easier if you spoon out the peanut butter onto a small saucer so when it's time to add it to the fudge you can just push it off the saucer into the hot fudge.

If you don't like peanut butter or nuts just leave them out. Dirt Farmer Fudge is still kick butt without them!

6. Keep an eye on the boiling fudge and start checking it for consistency. As it boils it will thicken. If you under cook it you will have a sticky glob that will never harden. If you over cook it you might not even get it out of the pan.

Or if you over cook it it will set up almost immediately when you pour it which means that it will not be creamy and it will be too dry and I'll be really disappointed in you. Okay, maybe it won't be that bad, but you'll never know how good this fudge is when cooked perfectly.

7. Test the fudge by dropping a small amount into a dish of cold water. When it is done perfectly it will puddle in the bottom of the dish and you'll be able to push it into a small pile with your finger then you should be able to pick it up between two fingers. Test the fudge early and often. Watch the video so you can see how I do this.

If it can't be picked up, rinse the dish and add fresh cold water and test it again soon. It takes a while for it to boil down to the perfectly consistency, and there is a fine line between over cooking and under cooking it. Check if often.

8. As soon as the fudge is done remove the pan from the stove and place it on a hot pad. Immediately add the butter, the vanilla, the walnuts and the peanut butter. Do Not Stir it Yet!

9. Just let the fudge cool a bit. This is a critical and scary timebut you really want it to cool down to about 140 degrees Fahrenheit which means that you can almost place your hands on the outside of the pan without burning them. Please be careful, do not stick your finger in the fudge and only put your hands near the outside of the pan.

10. Once the fudge has cooled, start stirring it. As you stir it the fudge will thicken and lose it's gloss. Get ready to pour quickly once that happens. Sometimes you barely get the peanut butter mixed by the time the fudge is ready to pour into the dish.

11. Pour the fudge into the dish and quickly push it into the corners of the dish then quit smoothing the fudge. The top will set up quickly, but if you've cooked it perfectly the rest of the fudge will need several hours, up to 24 hours to really set up completely.

This makes a really moist fudge so I cut it into small squares and place it in a container or onto a serving tray. Often times the bottom of the pieces will stay moist so I lay a paper towel in the bottom of the tray to help wick away some of that excess moisture. I stack it on the tray with a little space between the pieces so the edges can air dry but inside the fudge is nice and moist.

When done perfectly, Dirt Farmer Fudge is to die for!


The Society of Garden Designers; a damp squib washed up on the shores of mediocrity.

iStock_000008599764Small-1
Are so called professional body; the Society of Garden Designers, has forced through what I consider to be the worst piece of legislation in its pitiful 30 year history.
It has decreed that from 2010, if you want to apply to become even a lowly corresponding member you have to submit work before a panel of your peers to be weighed, measured and no double found wanting!
Its bad enough having to apply for full membership in this patronising and archaic fashion, but to expect potential probationary members to go through this as well is frankly bonkers.


It doesn’t take a genius to realise that the whole membership thing is in a mess.  Why is it that the membership ratio of full members to corresponding has never risen much abou 1-10.
That’s right;  after 30+ year there are only about 180 full members of the society in the whole world!  This despite consecutive councils trying their best to up the numbers.
Councils discuss the same things and make the same mistakes time in, time out, like some giant horticultural ground hog day.
They think by vetting the ‘newbie's’ and putting a 2 year time limit on them to apply for full membership they will improve things. 
Far from it! I predict the membership will fall further and the organisation will become even more redundant than it already is.
In any other professional organisation, education is the route to full membership.  Surveyor, engineer, architect, all have to have a first degree before they can apply.
Unfortunately the SGD has been too much of a coward to go down this route, because so many of the founding members have a vested interest in the lucrative garden design education market.
Take away the corresponding members and you don’t have a viable membership.  So the Society  has become little more than a Surrogate training centre for sub- standard design schools.
It’s not until students have completed one of these lesser courses, that they realise how poor their training has been, only to be taken up by the SGD’s seminar program which in itself is a poor substitute for proper tutorage.
Instead of this controversial adjudication panel, I propose the SGD introduce and examination.  This could then be sold to the schools and colleges at a profit and would weed out those courses not capable of passing it.
The colleges could then use there exam marks as a guide to the quality of the course.
If they still wish to have a period of professional practice before full membership then so be it, but stop this lunacy before more of us give up on you and don’t renew our memberships.

Saving Your Amaryllis Bulbs

For years I would buy Amaryllis bulbs at Christmas and try to get them to re-bloom the following Christmas - I would follow the instructions on the box about putting them outdoors, bring them inside in the fall and withhold water yatta, yatta, yatta. I would usually end up tossing the dried up, non-blooming bulb in the trash in January.

A few years ago my mom told me about her friends' Amaryllis that bloomed every spring. I tried her method and now I have bunches of bulbs and flowers as early as April.

Here's what I do. I buy the bulbs in bud at Christmas, enjoy the flowers and then place the plant in a lighted window or under lights in my basement. In the spring I put them outside (still in their pots) and fertilize with a timed release fertilizer and let them stay until fall. Generally the new bulbs won't bloom that first summer. I over winter them in the basement again and do NOT water them at all. Even without water, they often do not lose all their leaves. These are hardy plants! When the weather warms up and I feel like we won't have any more frost, I bring them outside and give them a drink and a dose of fertilizer. Often they will have made new baby bulbs over the winter and usually there are buds starting to peek out too. They bloom for several weeks when not much else is flowering. I have several pots of bulbs now from the first Amaryllis that I started with. The one in the picture is a pot of baby bulbs from that original plant.

I pretty much allow nature to care for them during the summer and only water if we have a long period without rain. I tuck their pots in the garden and enjoy their foliage until late fall when I repeat the process all over again.

Last summer I planted a couple of large bulbs close to my foundation outside and I can't wait to see if they will survive the winter. They are protected fairly well and I mulched them heavily with leaves. I'll report on that experiment later.

Remaking the fish pond.


Awesome! Beautiful! The pond looks great, how did they do that? These are just a few of the comments from visitors to the Flower Bin indoor fish pond, lately. And it has been an amazing transformation, one that took over a week to accomplish. Luis started with a vision of how he wanted the pond to look. It had been more than 10 years since we first installed the fish pond at The Flower Bin and over those years, the fish and the pond have been a popular destination spot at the ‘Bin.


 Luis, with Nacho (pictured) and Rick’s help, began by removing as much of the old pond as possible, while leaving the fish alone as long as possible.  To finish the excavation, the fish were moved to a temporary holding tank, with supplemental pumps running for oxygenation.


Next, a woven fabric underlay was installed and then the rubber liner was set in place.
The old skimmer was replaced with one that holds two pumps instead of one. Piping was installed along both sides of the pond to feed each up-flow filter, at the top of the waterfall.


The skimmer and both up-flow filters act together to keep the pond water clear and healthy for the fish. The addition of two large sandstone slabs allows the fish to swim under the walk. This also hides the aeration pump, which runs 24 hours a day.
 Moss rock was carefully added to the exterior of the pond and a large piece of flagstone was set to enhance the waterfall. A stone path was laid to allow easy access to the pond.
The fish were carefully returned to their new home, where they enjoy entertaining visitors of all ages. Are you interested in adding a pond to your garden? Bring us your ideas and we will help you design the pond you’ve always wanted, including ordering the right equipment to keep your pond healthy and low maintenance. Go to our Pinterest account to see more images of the pond rebuilding project:   http://www.pinterest.com/flowbinco/rebuilding-the-pond/

Spring Is Not So Far Away

I was really feeling blue a few weeks ago. Snow, below zero here in Tennessee, big dogs sleeping on my couch because of the cold. I decided to cheer myself up by remember how beautiful my yard was last May. Here's the video of my gardensfrom last year. They will be that pretty again and so will yours!


Juniper Berries

I love this time of year mainly because of the changing colors of the leaves, but also because the berries of so many shrubs and other woody plants become more prominent.

Here are some beautiful Juniper berries: 
 The berries of this Juniper are a waxy, blue color and cluster closely together. I think the blue is so striking against the green of the needle-like/scale-like leaves.

Actually, the berries on Junipers are not actually berries at all. They are cones, growing only on the female plants. Junipers are dioecious, which means that individual plants are either male or female (unlike most other plants where male and female parts exist on the same plant). So the female juniper plants produce the berries (cones) and the male plants produce the pollen.  

Various types of junipers have different uses:
The spicy-smelling berries of Juniperus communis (Common juniper) are the predominant flavor in Gin.
The fragrant wood of Juniperus virginiana (Eastern Red Cedar) is used for cabinets, fences and pencils.
The wood of Juniperus phoenicea (Mediterranean Phoenician juniper) is burned as incense.
(Encyclopedia Britannica)


I found a recipe for making Gin on ehow.com. It calls for 10g of juniper berries (that's about 1/4lb) - which is a lot of berries! I'm not sure this little shrub will produce that many... nor that I would want to even distill my own either. But I think it's still a pretty cool fact!

Madagascar Dragon Tree Care

Madagascar Dragon Tree
Common Name:Madagascar Dragon Tree
Scientific Name: Dracaena marginata
Lighting: Moderate to Low
Watering: Moderate


The Madagascar Dragon Tree is to me one of the most popular houseplants, yet one of the hardest to identify. I looked through many houseplant books before actually finding the name of this particular Dracaena. Needless to say, this is a great houseplant and one of my favorites. Long, narrow, spike like foliage characterize this plant. Foliage is usually green with a red outline, thus giving the houseplant its drama.


The Madagascar Dragon Tree is fairly easy to care for. The greatest thing I like about the Madagascar Dragon Tree is that it allows you to create your own look with it. As you can see from mine, I just let them go at will. However you can brace your stalks up, twist them or create your own attraction with them.


Dracaena

The Madagascar Dragon Tree requires moderate to low light levels. This Dracaena can usually withstand lower light levels than some of the other Dracaena's. As with many Dracaena varieties, if the dramatic coloring or variegation on the foliage begins to fade, the plant may not be receiving enough light.


This houseplant prefers to have moderate water levels. So keep the soil fairly moist at all times. Dracaena's are native to the African jungles, so they do require higher humidity levels. If the tips of the foliage begin to brown, it may be a sign that there is not enough humidity in the air. In the winter, simply running a humidifier may be enough to supplement their high humidity requirements. Otherwise you can also give your plant a nice daily misting instead.


Keep in mind, this houseplant sheds its bottom foliage frequently. This does not mean you are doing anything wrong in terms of caring for it. Just as the plant grows the bottom leaves shed.


Things you’ll need for successful seed starting


Begin with choosing quality seeds. Seeds are available in a wide variety of vegetables and ornamentals. The important thing is to select quality seeds and read the packet.
There is a wealth of information regarding sow rate and depth, time to germination, as well as a description of the plant.
Then, select your seed germination supplies. Seed starting trays are available with and without drainage holes. Inserts are available with a number of seed-holding cells, though typically there are 72 cells in each tray. These inserts fit into your seed starting trays. You can start your seeds in individual black form pots, or biodegradable pots.
These come in a variety of shapes and sizes, from expandable pellets, to round, square and egg carton.  
Heat Mats keep the seed starting soil temperature constantly warm, which promotes larger root systems and sturdier plants. Heat mats are available for a single tray or two trays. We also carry large, 4-tray mats and we carry a window sill size mat that is 5" X 24". Humidity domes raise the humidity and hold moisture for your seedlings.
These domes are 7" high and have two air vents in the top, to help control condensation.  You’ll want to supplement the light in your house with grow lights. These lights provide your seedlings with the right kind of light to develop strong plants. Grow lights are available in Compact Fluorescent Lights (CFL) and Fluorescent bulbs. You can learn more about lighting at: http://theflowerbincolorado.blogspot.com/2014/01/get-your-seeds-started-right-with-right.html 
 
Seed starting mix is a sterile, soil-less mix, designed to get your seeds germinated.
This is a handy tool to have. It makes sowing seed easy and precise. You’ll want to label your trays so you’ll know the type of seed you’ve planted.
Labels are available in a wood or plastic and they can follow your seedlings from the starting tray right into the garden. Fertilizer for seedlings and young plants is important.  Once the seed sprouts, the first set of leaves you see are not true leaves. They’re called cotyledons and they contain enough food reserves to keep the seed going until the true leaves emerge and the plant can collecting energy from the light source you’ve provided.
At this point, you can feed your seedlings with a very mild solution of organic fertilizer, such as Neptune’s Harvest or Age Old Organics.