Showing posts with label how to. Show all posts

Tuesday, December 22, 2015

MY CHRISTMAS CACTUS - Schlumbergeras - How to have blooms from Thanksgiving til Christmas!

I have pink and red flowering Schlumbergeras. I grown them in pots and put them outside as soon as the spring weather is stable here in Tennessee. I bring them into the house (or greenhouse)  before the first frost. Up until this year they have bloomed at Thanksgiving rather than Christmas. This year  brought my big pink one into the house and put the smaller ones in the greenhouse. The pink one bloomed at Thanksgiving as usual but the ones in the greenhouse are blooming for Christmas this year! 

Christmas Cactus Red Flowers
So now I know how to have flowers from Thanksgiving through Christmas. If you don't have a greenhouse a cool basement or garage will work too. Check them and when they have big fat buds like the one here bring them into the house. These are really not cactus so do give them a drink more often than you would a cactus. As the blooms fade, carefully pinch them off so your plant stays pretty and fresh. When its done blooming put it somewhere near a window or other light source and take it back outside in spring (semi-shaded location) until fall. 

I had several in small pots that I started in spring from leaves, I brought them in and tucked the pots in container gardens that I was wintering over in the house. I loved they way they set off my Angel Wing Begonia!
Potted Cactus in container garden
Christmas Cactus Pink Blooms


Sunday, December 6, 2015

Fresh Cranberry Orange Relish


I have no idea where I first got this recipe. I may have created it myself. I never use a printed recipe so when I share one of my favorites, it's hard for me to come up with exact measurements. Cooking is a matter of tastes and personal preferences so taste as you go and I will do my best to tell you how I make this traditional family recipe.

Today I was cooking for about 12 people so this recipe will serve about 12 or 15 people a 1/3 cup serving. Half it or double depending on your family. This is best made a day or tow ahead of time to allow the flavors to meld. Keeps for a couple of weeks in frig. Make enough for Christmas and freeze up to two months.

Place the ingredients below into a food processor and process to the consistency you see in my photo. This is also good served along side any dish that needs a little zip! I serve it with while beans and homemade buttermilk cornbread - yummy!

KATHY'S FRESH CRANBERRY ORANGE RELISH
2 12 oz bags fresh cranberries
2 oranges (peeled, sliced and remove as much of the white inner lining as you can) see picture of what mine looked like
Peeling from one of those oranges
2 small Gala Apples cored and cut into chunks
1 cup pecans halves
1 teas. cinnamon (I use Ceylon)
                                                         1 cup sugar
                                                         juice of 1 small lemon


Sunday, November 29, 2015

Make a Natural Holiday Simmering Potpourri for Yourself or as a Gift


Do you remember making Cloved oranges as a kid? We poked cloves into fresh oranges  - usually in pretty designs but they are OK just where ever you want them as long as you put quite a few cloves. I did them and allowed the oranges to dry. They actually lasted quite a while in a pretty bowl. I arranged them above with pine cones and Fresh Rosemary.


Natural Potpourri Simmer
 Using the same idea, you can peel an orange (eat the orange or use it for juice), Dry the peel. I dried mine in the oven set on it's lowest setting. Check them often to be sure they don't burn. Break the orange peels in to small pieces, add  whole cloves, cinnamon stick pieces, whole allspice, dried apple slices and berries from a cedar tree. This last one is optional but it makes a really festive holiday fragrance. If you live near a woods where cedar grows the female trees are loaded with blue berries in the fall! . To make the house smell like Christmas simmer a couple tablespoons of the mix in a small pan of water on the stove Be sure to check often so it doesn't boil dry. I wonder if you can still find those potpourri simmering pots like I had several years ago. Not only does this smell delicious but will add humidity to the house and the essential oils are good to breath too. Package this up in little jelly jars or small bags for a nice little gift also.

Sunday, November 22, 2015

Cheap and easy Mini Hoop House for wintering over your plants


From my E-buddy Mike McGroarty  - read down to see directions for a mini hoop house to winter over plants.


There are a lot of different ways to protect the plants that you are growing for the winter months.  There are a few things that you need to understand.
1.  You don’t need a greenhouse.  You should be growing plants that are hardy in your growing climate, therefore they will be tough enough to make it through the winter just fine.
2.  Greenhouses are for growing plants and they are completely unnecessary for you Growing Plants from Home for Profit.  Greenhouses are not for storing plants over the winter months.  Read that again.  You Do Not Need a Greenhouse! 
There’s a big difference between a greenhouse and an over wintering hoop house.  A greenhouse usually has a double layer of clear plastic with air blown between the two layers for insulation as well as heat source and built in and automated ventilation to main a constant temperature conducive to good plant growth.  A greenhouse is designed to make plants actively and vigorously grow during the winter months.
An over wintering hoop house has a single layer of white plastic, no heat or ventilation at all.  An over wintering hoop house is designed to stay cold inside.
3.  Hardy plants must be allowed to go dormant for the winter.  You cannot drag them inside and keep them warm all winter.  That would the same as me keeping you awake for four months straight.  Plants need to sleep during the winter, winter is their resting period.
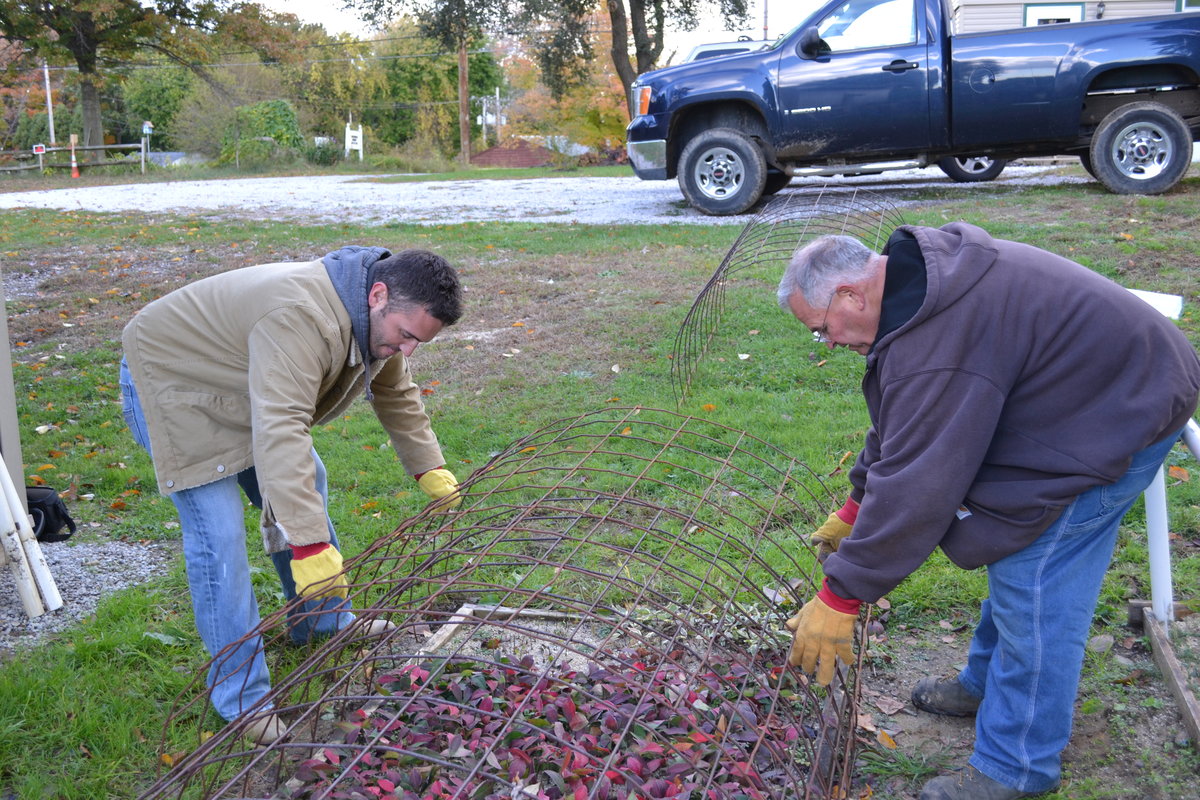
Mike and Duston McGroarty covering plants for the winter.
4.  Here in the north nurseries cover plants not to keep them from freezing, they still freeze even when covered.  They cover them to keep the wind off of them and to keep them moist.  Plants need moisture and during the winter when you can’t be out there watering because all of your outside water is turned off for the winter, the last thing you need is the wind pounding on the potted plants sucking the moisture out of the potting soil.

White Plastic, not Clear!

5.  When covering plants for the winter you have to cover them with white plastic because the white plastic reflects the rays of the sun and keeps the plants under the plastic at a uniform temperature.  They might be frozen as hard as rock under the plastic, and that’s fine, they don’t mind, really they don’t.  What they don’t like is to thaw out on a warm day, the freeze again that night and have that cycle repeating all winter.  The constant freezing and thawing is not good for plants.
Rooted cuttings getting tucked in for the winter.
6.  Clear plastic is used on a greenhouse where you want the sun to warm up the greenhouse.  However, without a heating system in the greenhouse as soon as the sun goes down things can freeze.   That’s why you never use clear for overwintering plants.  It heats them up during the day, tricking them into thinking it’s spring, then it allows them to freeze at night, causing them serious damage.
7.  White plastic is hard to find.  Hardware stores and home improvement stores don’t carry it.  You have to get it from a nursery supply house.  Or . . . you can use clear then once the plants are covered slosh white latex paint over the clear plastic.  This isn’t the perfect solution, but it does work.

Itty bitty Rooted Cuttings are Amazing Creatures and Tough as Nails.

At the top of this page I inserted a photo of Gold Drop Potentilla with a question mark.  I always use Potentilla as an example of a plant that seems so frail and so tender, yet come winter they are amazingly tough, even as little tiny, spindly rooted cuttings.  During the winter months I see them in propagation boxes, no leaves, skinny as skinny can be and I wonder how they can possible survive temperatures well below freezing, often down in the single digits.
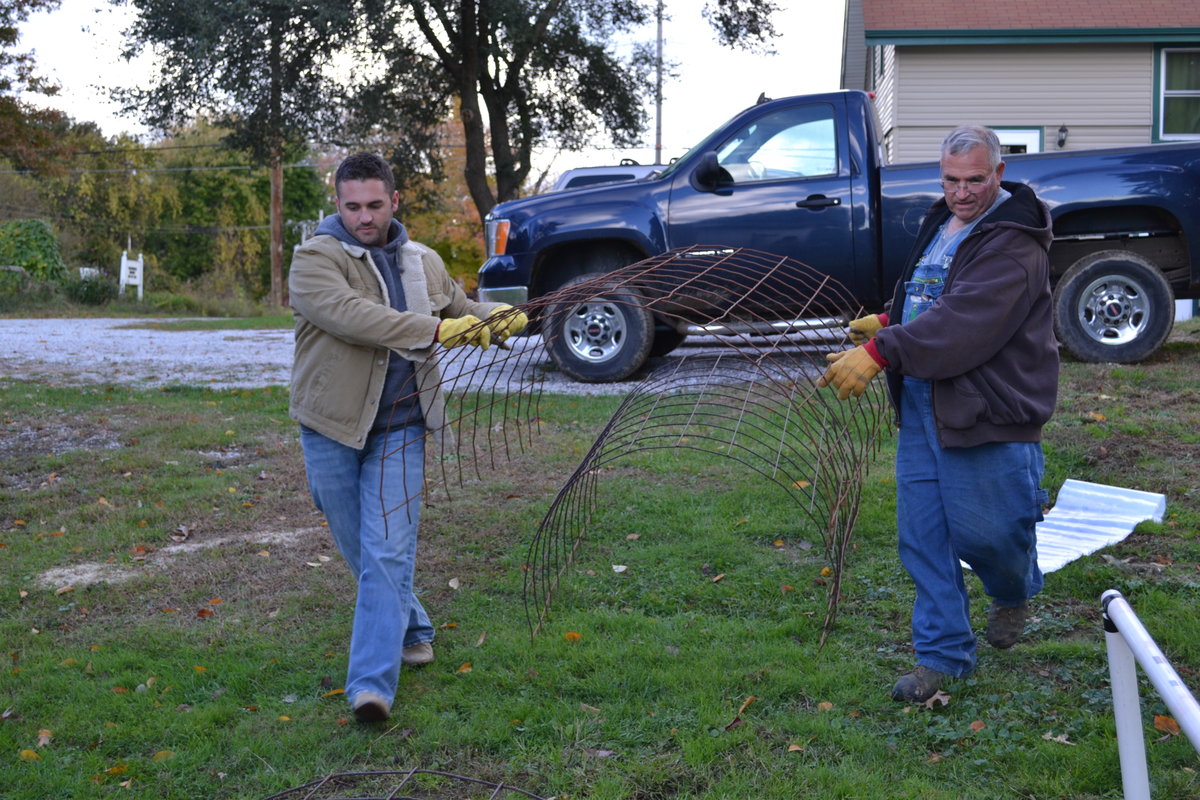
Mike & Duston McGroarty building a mini hoop house.

Step by Step Mini Hoop House House Plans Below.

Then come spring as I am walking by the propagation area I can’t help but notice them, covered with little tiny green buds just busting at the seams to open and I wonder . . . how is it possible that something so frail can be so tough.  I don’t know why, all I know is that all of my rooted cuttings respond the same way.  Come winter then just hunker down and wait it out.  They know they have a job to do and they do it.
So what about you and I?  What is our job for the winter?
Our job is to not interfere with what the plants already know how to do.  They know how to survive the winter.  It’s when we interfere, that’s when it all goes wrong.  How do we interfere?  We put plants in pots.  That’s an interference.  It’s not natural, it’s not normal for them.  So our only job is compensate for the situation that we created with some simple steps that I am going to describe and illustrate for you here.
What about the plants in the ground?  How do I protect them for the winter?
In most cases you don’t have to protect plants in the ground.  Most of the time, plants in the ground are safe.  It’s a natural environment for them.  That’s how they are wired, to survive the winter simply by being planted in the ground where they are supposed to be.
So why are plants in pots so different?
Great question!  Plants in pots are not in the ground.  They are above ground.  They are potted in a growing medium that is designed to drain well and drain fast.  That’s perfect for the growing season, but not so great for the over wintering season.  When we put plants in pots we do two things to them that is not natural.  We put them in a well drained potting mix, then we set them on top of the ground and let the wind pound on the thin plastic containers.  We let the sun warm them during the day dehydrating them.  The only thing between their precious roots and the harsh elements is a thin piece of plastic.  We prevent their roots from reaching out into the soil where they can pick up the moisture they need.

We Rob them of the Natural Warmth of the Ground!

Do Not under estimate the warmth of the earth.  Think about an igloo, made of snow, yet much warmer than the outside air.  Ground heat is precious to a plant grower, use it to your advantage and never do anything to separate your plants from the precious earth.
Things you should never do with plants over the winter.
1.  Do not put them up on pallets.  That separates them from the ground where they are the most comfortable and allows cold dry air to completely surround the pot or root ball.
2.  Do not bring them in where it is artificially warm.  They need to go dormant, and they need to stay dormant.
3.  Do not put them in your garage.  They are not a lawn mower.  Garages are really, really cold, and dry.  That’s the worst combination of all.  Plants need to be moist over the winter.  Not soaking wet, just adequately moist.
4.  Do not put them in your tool shed.  Same thing.  Many tool sheds have raised floors allowing bitter cold air under the shed.  They are dry places.  Good for tools and power equipment, not so good for plants.

The lower the hoop house the better for the plants.

If you’ve paid any attention to what most nurseries do for the winter this advice seems to be contradictory.  But it’s not.  They know the advantages of building low structures for over wintering plants and it’s not always necessary, and for those big growers it’s not always practical.  But if you really look around their nurseries, you are likely to find a low hoop house like we are building here.  Not many, but they do use them for special situations.
Why lower hoop houses are better.
Low hoop houses are close to the ground and we already discussed the advantages of ground heat.  They have much less dead air space between the top of the plants and the inside top of the hoop house.  That means higher humidity and a much lower need for you to water over the winter.  However, it certainly won’t hurt for you to poke a hole in the plastic and spray the garden hose around inside of your hoop house once a month or so.  If things are frozen and you can’t water, then you can’t and chances are your plants will be fine.  Just make sure they are plenty moist and or snow covered when you cover them trapping in all of that moisture.
Did you catch that?  Snow covered.  Snow won’t hurt your plants and most cases it’s good for them.  It’s plenty moist and snow is a great insulator.  Did you know that when the ground is frozen then a heavy layer of snow falls, the ground will actually thaw under the snow because the snow actually keeps the ground protected from the harsh cold from above and the natural ground heat from below thaws the frozen soil.
That’s an important lesson to grasp because you can use that information to your advantage as a grower.

Do Not Cover Your Plants Until they are Dormant!

I mentioned covering your plants when they are snow covered.  Often times it will snow before you have a hard freeze.  Plants need that hard freeze where the temperatures  dip below freezing for several hours in order to trigger them into dormancy.  You can have snow fall, but still not enough of hard freeze to trigger dormancy.  This year here in northern Ohio is a perfect example.  It’s November 7th, we’ve had a bit of snow, a few days ago it got cold enough to freeze the top layer of water in the donkeys water bucket, but it still didn’t get quite cold enough to knock the leaves off the trees.  I am patiently waiting for that to happen so I can start digging Japanese maples.

Why do big growers use such large and high hoop houses if lower houses are better?

Another great question, you are really on your game today!
Big growers are big growers and they do things in big ways.  They like really wide hoop houses that hold lots and lots of plants.  And they like to maximize every square inch of space they use.  Narrower hoop houses mean more driving isles between the hoop houses and that’s a lot of wasted space.  So they make the houses really wide, up to 40′ wide.  That means in order for the structure to hold up to a snow load it has to be much higher in the center in order to have the support that it needs.
Big growers leave their hoop houses up year round, they just cover them with white plastic for the winter and uncover them in the spring.  Big growers like high wide hoop houses because they can walk through them and even drive tractors through them.  Keep in mind, being that the structures are up year round they work inside of these hoop houses daily.
What are the downsides to a wide, high hoop house?
A high hoop house unless professionally designed is more like to collapse from a snow load.  High hoop houses have a ton of dead air space between the plants and the inside top of the hoop house.  That makes it really difficult to maintain a high enough level of humidity.  Because of that, big growers have to water inside of those big houses about every three weeks.
Now think about that.

We already learned that plants inside of a hoop house do freeze and are often frozen most of the winter.  So that means that the irrigation inside of the hoop houses has to be winterized.  Then every three weeks when they need to water the lines have to be reconnected and charged with water, then disconnected and drained again.  That’s a ton of time consuming work every three weeks and it also means that the water lines going to those houses have to be buried at least 48″ deep.  That’s the standard for water lines in northern states.  In other words, those houses have to be engineered with all of this in mind.
Open the doors, close the doors.  Open the doors, close the doors.
On warm days large hoop houses have to be opened up on both ends to keep the heat from building up and tricking the plants into thinking it’s spring.  We have a large grower right down the road here who has about 2,000 large hoop houses.  The manager told me that on a warm day they send out a crew of ten people to open all the doors on both ends of the houses and it takes those ten people almost half a day just to get them opened up.  Then if it’s going to get cold that night, they have to close them again.
And of course all of this opening and closing is letting the moist air out and the dry air in increasing the need to run the water.
Do Mini Hoop Houses have to be watered over the winter?
Not really.  In most cases if you make sure the plants are plenty moist the day you cover them they should be fine for the entire winter.  Huge advantage.  Like I mentioned above, if you get the chance take out a little insurance and spray some water inside to make sure, but if you can’t, chance are the plants will be moist enough.

Okay, let’s build a Mini Hoop House!

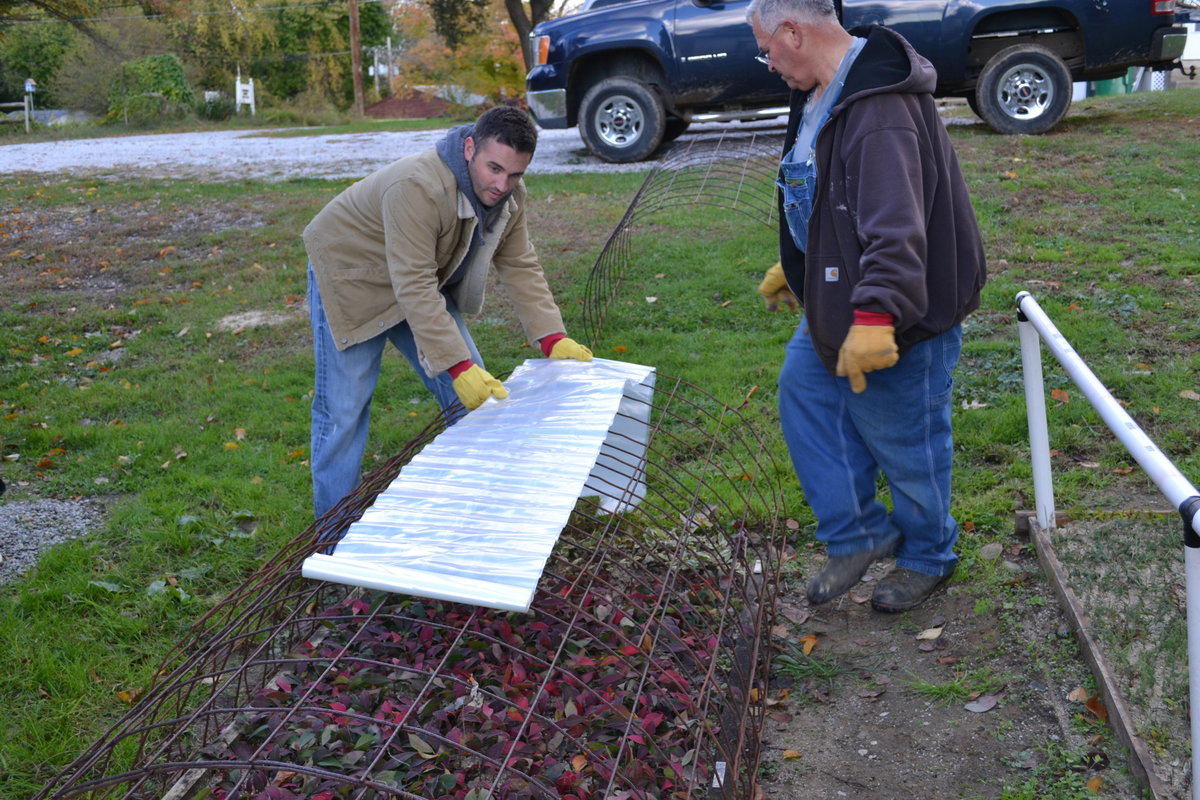
Building a Mini Hoop House with concrete reinforcing mesh.
The mini hoops that you see Duston and I putting in place here is actually concrete reinforcing mesh normally used in concrete driveways and sidewalks to strengthen the concrete.  The bed that we are covering is 44″ wide, we cut the concrete mesh into 7′ long pieces.  The plastic that we will roll over top is 10′ wide leaving about 18″ on each side so we can weight down the plastic with sand or soil on both sides and both ends.
Look closely and see where we cut the hoops.  We cut right in the middle of a square, that leaves short little legs that we can press into the ground on each side of the bed to keep the hoop from popping outward.
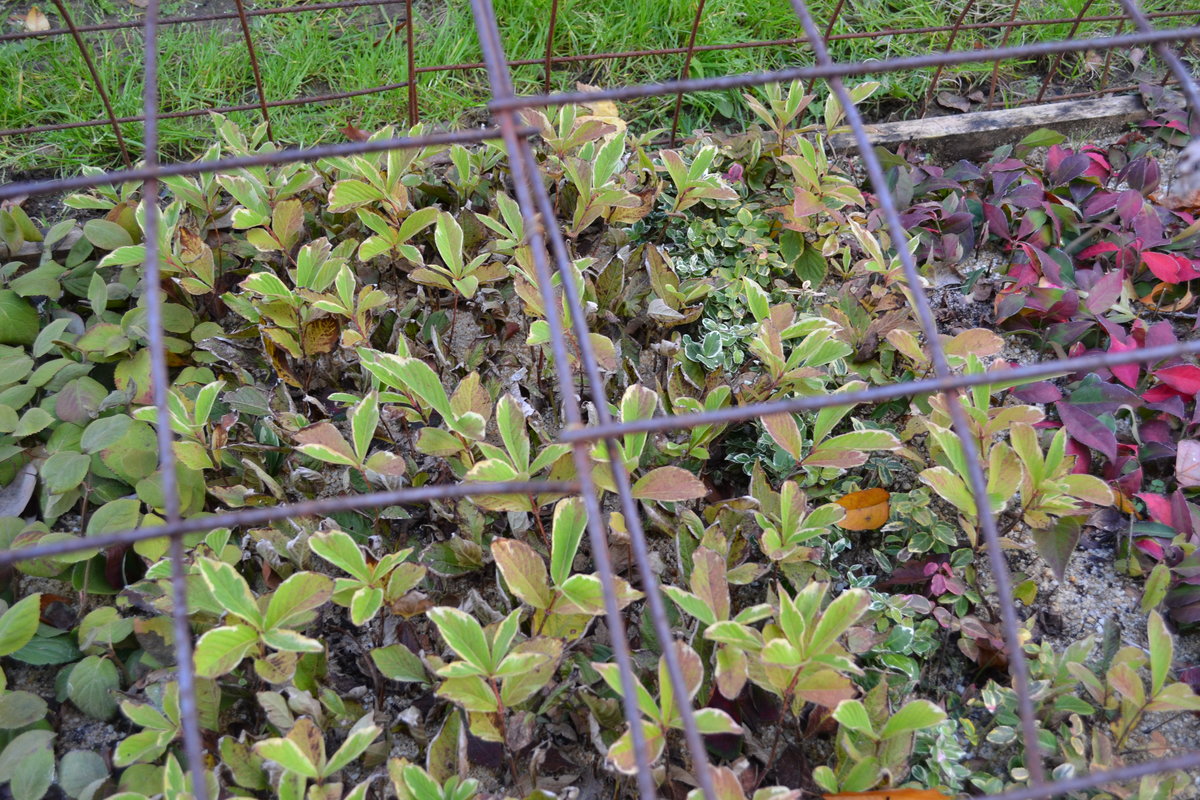
Covering rooted cuttings for the winter.
As we walk these hoops into place we overlap them just a few inches.
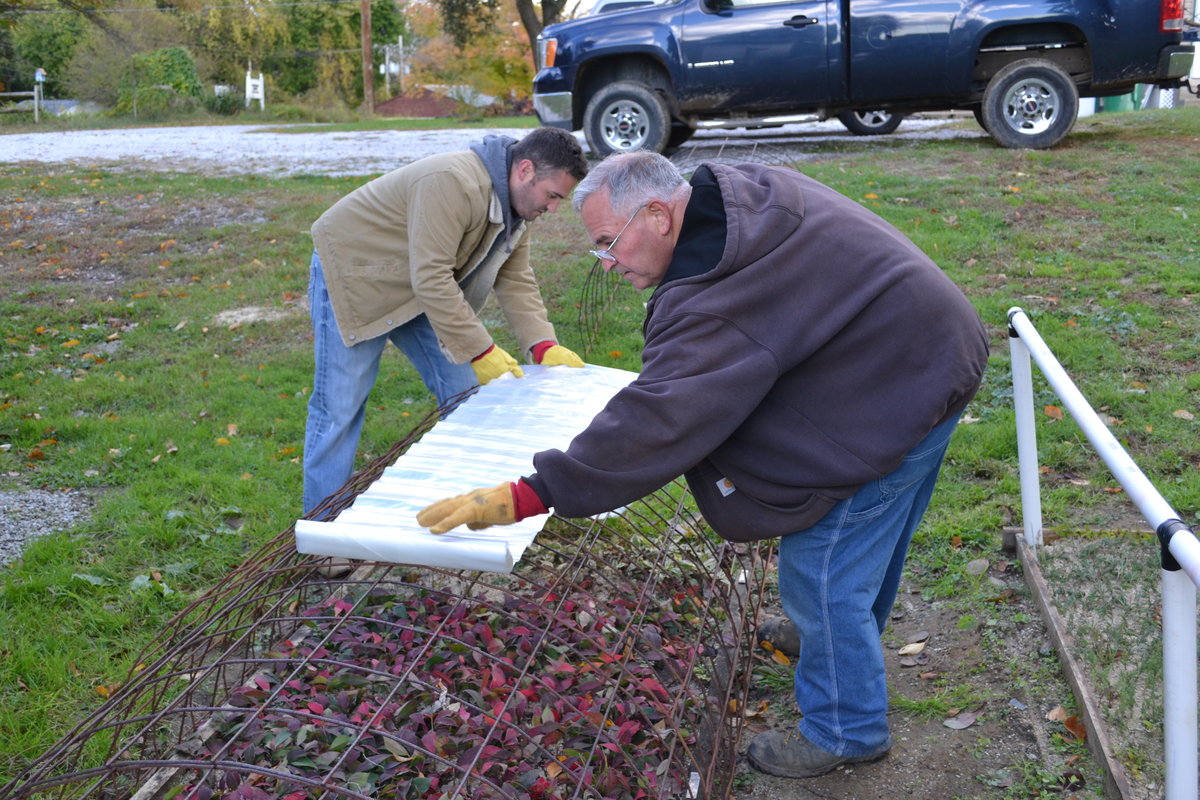
Using plastic to cover small plants for the winter.
The plastic is 10′ wide so we roll it over the mini house long ways, leaving enough over hanging the end so we can weight it down to hold it in place.  The plastic that we have in this photos is clear, therefore it has to be painted with white latex paint as soon as the house is covered and weighted down.

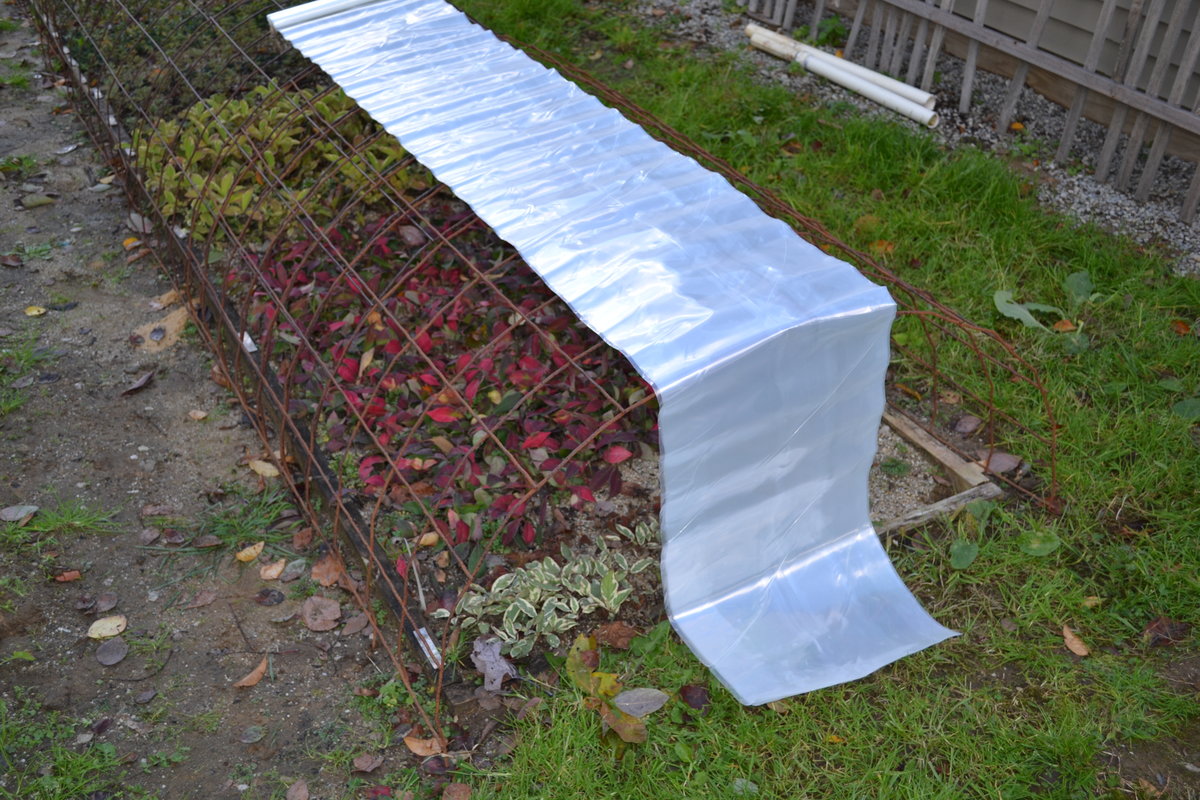
Over wintering plants with a mini hoop house.
Once we have the plastic rolled out from end to end over the mini hoop house we open it up and pull it to the ground making sure that we have about 18″ of extra plastic all the way around.  From here follow these simple steps.
1.  Open up the plastic and weight it down with sand or soil.  You cannot use bricks, blocks or lumber to hold the plastic down, it just won’t work.  The wind will pull the plastic loose and once the plastic is loose it will start flapping and eventually tear or come loose exposing your plants to the elements.
2.  Make sure the plastic is very taught so it cannot be moved by the wind.  As you pour on the sand or soil be sure to pull the plastic nice and tight and weight down the plastic all the way along the edges.  Do not leave any spots along the edge where there is no sand.   I prefer sand because it won’t get muddy and come spring it can be spread out and pretty much disappear whereas soil could be muddy and create a weed situation.
3.  If you’ve used clear plastic you must immediately slosh on some white latex paint so the rays of the sun bounce off the plastic.  You can buy 10′ wide white plastic at a nursery supply house.
4.  If you have an opportunity over the winter when your garden hose is not frozen, just poke a small hole in the plastic and spray some water around in the house.  All it can do is help.  If you can’t water inside, with a low structure like this you are probably fine.
If you have taller plants to cover you can still use these mini hoops, just water the plants really, really well, then lay them over on their side.  The first row you might want to prop up with something so they are not laying in the soil all winter.  Maybe a bail of straw.  The rest will lay on each other, then cover as we did here.
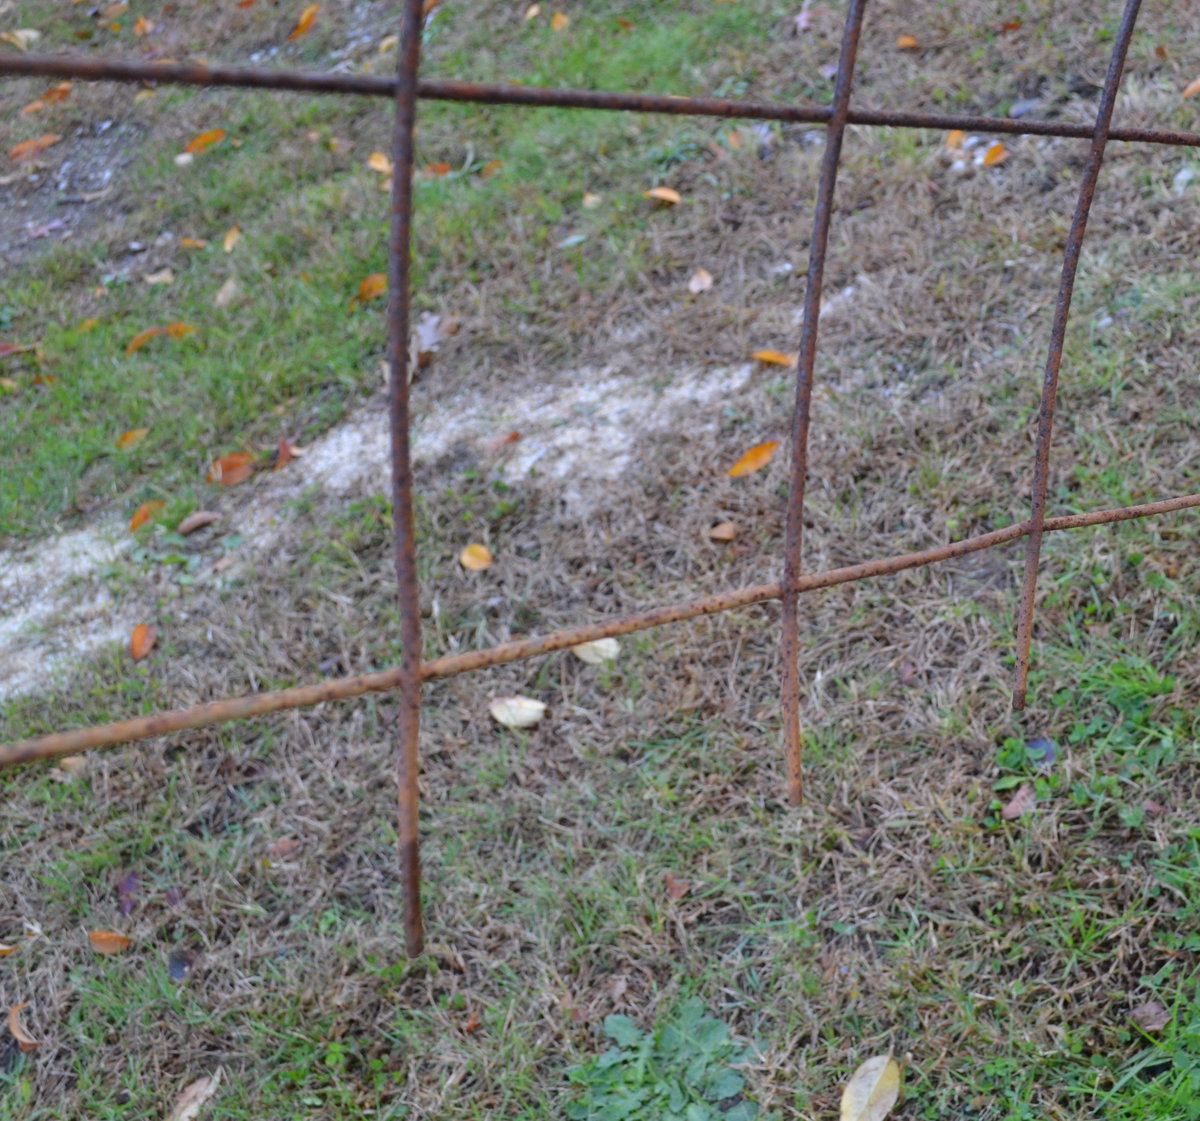
Mini Hoop House made of concrete reinforcing mesh.
This photo shows how we cut in the middle of the square to get little legs to stick in the ground.  You really need a small pair of bolt cutters to cut the wire mesh.

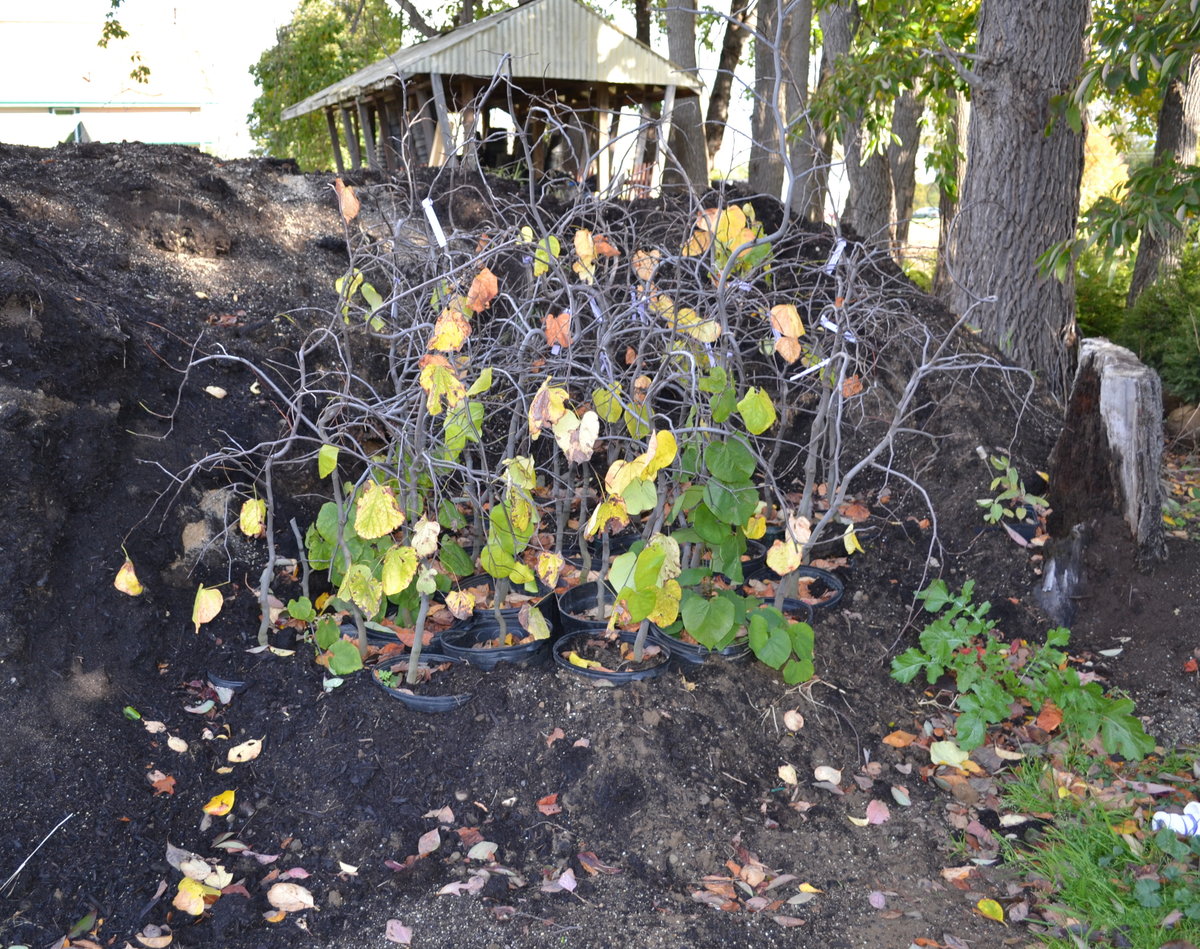
Heeling in trees for the winter.
These Lavender Twist Redbud trees are too big to cover with a mini hoop house so I moved them to the south east side of my potting soil pile, dug out a small area for them, protected from the wind by the potting soil pile, then I packed potting soil around the pots and a little over the pots.  They should be quite happy there for the winter.  This will keep the roots from drying out.

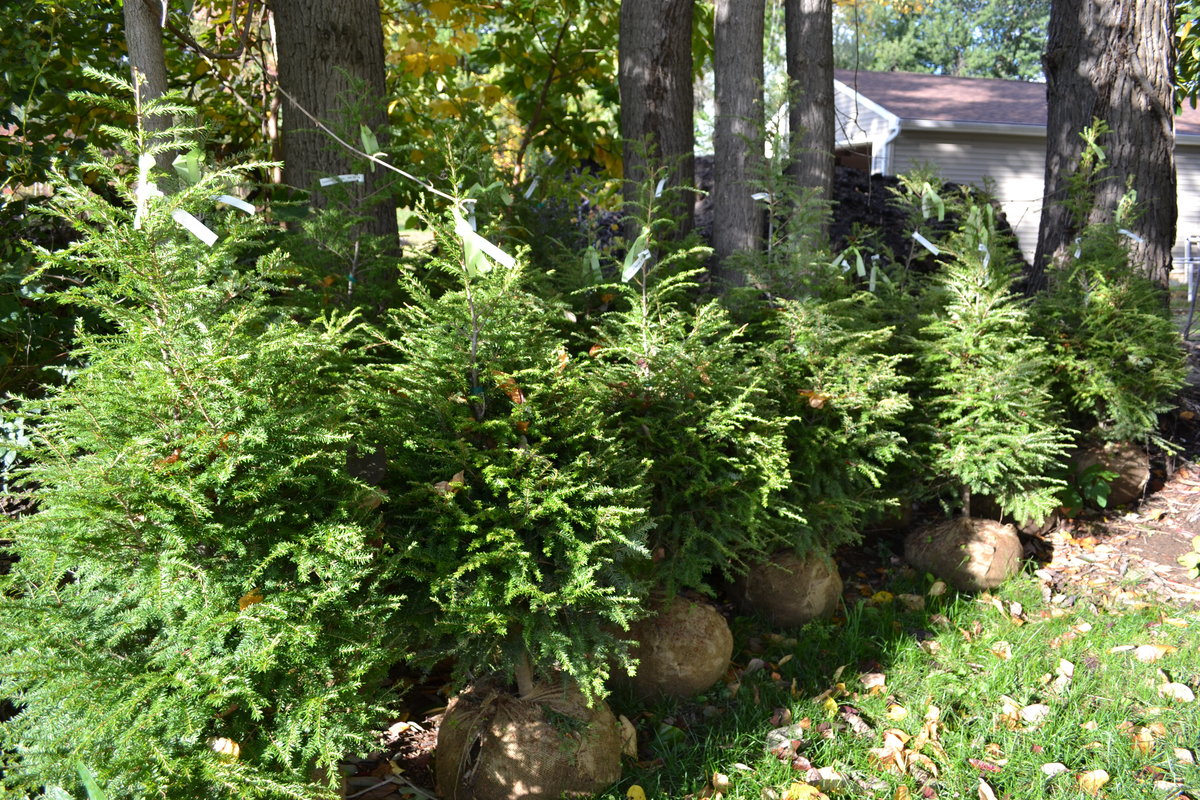
Heeling in Canadian Hemlocks for the winter.
Same for these Canadian Hemlock.  We moved them to a protected area, then were just going to pack some leaves around the root balls, but I changed my mind about that.  The burlap on these trees is regular, untreated burlap and by spring the bottoms will be rotted out of these root balls.  So our plans are to first put these into some large pots that we have laying around, cover the root ball with soil, then as the burlap rots we have them pre potted and they will root into the pot.  That way they can be easily moved in the spring without breaking the root balls and we won’t have to re-burlap them in the spring.
When the leaves really start falling we’ll collect some leaves and pack around these root balls to keep them warm and moist.
As a side note about burlap.  I have about 450 Japanese maples to get dug over the winter and those we will put in a poly burlap that will not rot.

Mouse Bait, mouse bait, mouse bait, mouse bait!

Did I mention mouse bait?

When you take these kinds of measures to protect your plants from the harsh winter winds you are at the same time creating a perfect place for things like rabbits, chipmunks and mice to spend the winter.  They will love you for making their winter home for them.  They will also eat and kill your plants.

Mice kill plants all the time!

Mice seem really harmless, but when they nest in and around your plants they will eat the plants, often times eating the bark off the stem of the plants completely girdling them and killing the plants.  The damage seems small and harmless, but keep in mind, your plants receive all of their nutrition though the cambium layer of tissue that is found right below the bark.  And on some plants, that cambium tissue must be quite tasty because they can and will eat it up as far as they can reach standing on their itty bitty back legs.
I knew this guy once that thought the chipmunks in his yard were cute so he wouldn’t use mouse bait.  That winter the mice ate about $5,000 worth of my recently grafted Japanese maples.  Can you imagine?  One winter they also ate all of my rooted cuttings.  Except the Red Twig Dogwood, apparently they didn’t like those.  But the rest of the cuttings were chewed off right at ground level.  About 50% of them came back nice and full so it wasn’t a total loss.  But honestly, they mowed them off at the soil level.  The mice just moved in and set up house under the plastic with a built in food source.
But the Japanese maples?  That was a tough pill to swallow.  I had spent months the previous winter Grafting those Japanese Maples.
I don’t like to kill things, but in this business you can’t let rodents eat you out of business no matter how cute they are.
You can buy weather resistant mouse bait blocks at a farm supply store.
Be careful.  The bait is poisonous to pets and dead rodents that have been poisoned are deadly to pets as well.

Sunday, October 4, 2015

A Quick Tip for Refreshing a Faded Flower Container

You know when I find a good tip I like to pass it on to my blog friends. This one came in my mail the other day and I think it is pretty timely and an easy fix for those faded summer containers. http://www.gardengatenotes.com/2013/09/10/ba-container/?utm_source=GardenGateNotes&utm_medium=email&utm_campaign=7385


Sunday, September 13, 2015

How to have beautiful roses and flower arrangements too


A cheap natural trick for beautiful roses:  flatten a banana peel and bury it approximately 1 inch deep at the base of each rose bush. Bananas contain Potassium and roses love potassium. Potassium also helps with disease resistance too - for roses as well as humans :-)

A few tips for keeping fresh flowers such as roses and other blooms fresh longer in arrangements:

* Remove any leaves that would be under the water, But don't remove the thorns from rose stems. This seems to shorten the life of their blooms,. Most florists remove the thorns for safety reasons but you can leave them on the ones you bring in from your own garden. 

*Lukewarm water is best for most cut flowers, but use Cold water for flowers that grew from bulbs like daffodils, Tulips, etc.

  *Do not place fruit near your cut flowers.  Fruit releases natural gas that will cause your flowers to die or wilt sooner. 

  *Keep your arrangement away from direct sunlight too.

 Here is a recipe for homemade flower bloom preservative:

2 Tablespoons Lemon Juice to 1 qt water, 1 Tablespoon Sugar & 1/2 teas bleach, 1 aspirin and a penny - yes, a penny! It's the copper. Drop a penny in a vase of tulips to keep the flowers from opening too soon. 


Thursday, August 27, 2015

Sunday, August 16, 2015

Growing and Propagating Coleus


Coleus "Trusty Rusty"


Coleus are easy to grow and care for. They are not hardy above zone 11 but are so easy to overwinter that it is worth having these beautiful plants as part of your landscape or as container plants.
Coleus are grown mostly for their leaves and will get leggy if allowed to bloom. The newer varieties such as Trusty Rusty above and  Tricolor at left rarely bloom or maybe it's because I keep pinching mine back to make them fuller that they don't bloom. All plants can have color variation depending on maturity, fertilizer, temperature and light. For the most part, coleus with red and orange leaves tolerate all day full sun. Too much sun can cause purple-black ones to fade all over or they may scald (have pale burn spots on leaves). And for any color, too much shade can keep all the colors from coming out. I have some in shade and some in part sun and I haven't noticed too much difference in leaf color. See how pretty Coleus are with these Geraniums in a large pot.


Propagating Coleus is easy! I root mine in water but you can also stick cuttings dipped in rooting hormone in a mix of sand and perlite and they root fairly quickly. Add mist and they will root even faster. I prefer rooting cuttings in water because it takes much less room and trouble. I should call this blog The Lazy Gardener! Here is a picture of Coleus that have been in water for about 3 weeks. See all the roots. They are ready to pot up. If you are growing Coleus in water to winter over, I do this often - no soil just water in a sunny window - trim the roots if they get long and stringy. They will tend to rot and ruin your plants. I add a tiny amount of liquid fertilizer to the water if I am keeping them in water over winter. 
 
So don't let the fact that Coleus are tropical and they do not flower keep you from trying this easy care plant. They are fun and easy and beautiful!


Saturday, July 25, 2015

Fun Gardening, Cooking and Craft videos!

OK I'm guilty. I spent way too much time today on Youube. But  it is a Saturday morning after all - or was when I started! LOL!

Here are a few awesome tips I found there.


and one more...these girls are sort of silly but it's a cute idea.


Sunday, July 5, 2015

How to Make Stevia Sweetener and Liquid


Of course this is assuming you are already growing Stevia. If not, it's an easy herb to grow. It is hardy in zones 9 and 10 and is grown as an annual otherwise. I grow mine in a big pot and winter it over in the cool greenhouse. It grows fast and likes moist soil and sunshine.

Harvest the leaves at any time but be sure to harvest them all in the fall before frost. I don't let mine bloom because it wants to go to seed after it blooms. Besides, cutting it makes it fuller with lots more leaves.

For Stevia liquid:

Cut the stems about 2/3 of the way down. This leaves room for the plant to grow more branches below where the cut.  I dry mine with the leaves still on the stems. you can dry them in the sun (cover with net to keep clean) or in a dehydrator. I put mine in my hot empty greenhouse. If you use a dehydrator, set it on 95 degrees and it will take about 24 hours to dry.

Strip the leaves from stems and grind in a coffee grinder or use a motor and pestle like I did.

To make the liquid stevia, dissolve 1/4 cup pure homegrown stevia powder with 1 cup hot filtered water.  Stir and leave out at room temperature for 24 hours.  After 24 hours strain the stevia out of the liquid and store the liquid stevia in the refrigerator. Tastes just like the expensive stuff you buy at the grocery! 

Some people use the leaves dried as a sweetener.  It works and is healthy (300 times sweeter than sugar). I personally don't care for the taste but you should try it for yourself. . 

1.                              


Saturday, July 4, 2015

To Prune or Not To Prune...

That always seems to be the question from my customers and gardening friends. The answer is always... Prune! Don't be afraid to prune - when in doubt err on the side of cutting that plant!

I don't even worry too much about when. I know most garden books will say "best pruned in fall or cut back in the spring." That may be true but my theory is "If it needs cutting do it now". God created plants to grow back. Nothing is more unattractive in a garden than a leggy plant. Besides, every time you prune, you create the opportunity for the plant to put out more branches and leaves and flowers.

Look at the before and after of this Autumn Joy sedum.
Before
See all the new growth on the "after" picture. Every one of those stems will produce a flower.  I'm sure there are plants out there somewhere that don't respond well to pruning but honestly I don't know of any.

To get more blooms next year on your Hydrangea, prune it after the blooms fade. If you prune before the plant blooms in the spring you will prune off this year's flowers. Hydrangea bloom on new wood so if you cut the flowers off as soon as they start to fade, you will get lots more branches and lots more blooms next year.

Azaleas, viburnum, spirea, weigela, petunias, geranium, butterfly bushes, coleus are just a few of the plants that benefit from pruning.

After
There is much controversy about cutting back clematis. Remember it takes at least three years to establish a Clematis vine. I have grown Clematis successfully for years. I prune mine when they get too big for their trellis or if they seem to have very thin week vines. I prune all my varieties in the fall - I can't make myself prune off the tiny buds in spring. I know the books say there are three types of Clematis and they should be pruned according to the type - I pretty much ignore that and prune as needed in fall. So far in 20 years of beautiful Clematis this has worked for me. The fall pruning causes more vines to come up the following spring. I have pruned a big overgrown vine in summer and been rewarded with a new flush of flowers in the fall.

Get your pruning sheers and don't be afraid! The plants will reward you with lots of foliage and flowers!


Sunday, June 14, 2015

Drink a Cup of Thyme Tea Instead of Coffee and Promote Good Health


Drink a Cup of Thyme Tea Instead of Coffee and Promote Good Health  This links to a very informative post about Thyme: what it's useful for, how to make tea, using it in cooking ... lot's more. I've sold all sorts of Thyme in my little back yard nursery. In fact, I started some cuttings of variegated lemon Thyme under the mist in the greenhouse yesterday.

Sunday, June 7, 2015

Make Bath Salts from Your Rose Petals


May and June are the months that our roses are at their peak of bloom. I always hate to see all those beautiful fragrant petals go to waste. How timely it was for me to receive this recipe for Rose petal bath salts in the mail today. I'll pass it along to you as well as my recipe for rose petal potpourri.
 
For bath salts you will need to mix  1/2 cup each Epsom Salt and sea salt with one tablespoon rose petals (or more if you like) and two drops of rose oil or lavender oil - optional but it will smell yummy. Add all this to a big tub of warm water for a relaxing soak. I'm going to make four times this recipe and store in a container. That way I'll have plenty for long tub soaks after a day of working in the garden. 

Rose and Lavender Potpourri
For a pretty as well as fragrant potpourri, use two cups dried rose petals, 2 cups dried lavender (leaves and flowers) and one tablespoon Orris Root powder. The Orris Root fixes the fragrance so it doesn't fade away as quickly. Mix all ingredients together in a glass or stainless steel bowl and store for a few days in a container with a tight fitting lid until all fragrances are blended. Put into a pretty bowl or make little sheer bags of it to place in closets or give to friends, Hint: dry your rose petals and lavender together in an open container to blend the fragrance even more.

Sunday, May 24, 2015

Make your own Croutons

Home made croutons


Why spend two or three dollars a box for dry tasteless croutons when you can make your own from left over bread. I save the end pieces and any left over bread and make croutons with my dried herbs (or Italian spice mix) and olive oil spray - real simple and quick!
Seasoning ingredients


Start with the bread and use kitchen scissors to cut it into small squares,

bread ready to cube
cubed and ready to bake

Now spray the pieces with olive oil spray. Spray is cheaper and easier than pouring messy olive oil all over the place. I use my fresh dried oregano and basil plus garlic salt but Italian spice mix will work too. I use it generously! Toss to coat well and pop into a 350 degree oven for about 20 minutes. Stir the croutons about half way through.They should be golden brown and crispy when done.  Let cool before storing in a baggie or tin. Enjoy!


Saturday, May 2, 2015

Simple Orange Vinegar Cleaning Solution

I use vinegar for lots of things around the house. We even make a drink with it to help prevent kidney stones. I had a kidney stone recently from taking too much calcium supplements! I never want another one! I'll post that one at another time.

Here is a "smell good" all purpose simple cleaner:

2 quart jar of orange peels
white vinegar

Put fresh orange peels in jar, cover with vinegar and let sit for about six weeks.Strain out the liquid, pour into a spray bottle and use it to clean sinks and counters, stove top too. Add a little baking soda and spray to make an abrasive for cooked on stain.  Don't forget to toss the used orange peels in the compost.

Saturday, April 18, 2015

Seed Potatoes in a Barrel!

I have very little sunny space for gardening in my yard. This year I am doing Straw Bale Gardening and I will post my experiment here soon. In addition, I am growing potatoes in half barrels. My son gave me a big white plastic barrel that had been around his work yard for years. It had not contained anything hazardous. Bill sawed it in half and drilled 1/2 inch drainage holes around the sides and in the bottom of the half that was the barrel bottom.

Here's what the bottom of that barrel looked like when Bill was finished drilling drain holes. I used a coffee filter to cover the big hole that was in the top.
Next I put about 4 inches of compost in the bottom of both barrel halves, laid my seed potatoes on top of the soil as in the picture at the top. I did red potatoes in one and Yukon Gold in the other half. Next I covered the seed potatoes with more compost until I could not see any of the potato seeds. picture below:
As the potatoes grow, I will keep covering the vines, leaving a few leaves to soak up sun, until the vines reach the top of the barrel. At that point I will let them spill over the sides till it's time to dump out my harvest! I'll post more as they grow.

Saturday, February 28, 2015

GROW YOUR OWN MEYER LEMONS FROM SEED

I look forward to December every year not only because of Christmas but because our local grocery has Meyer Lemons for sale.

They are a real treat for us tea sippers and lemon lovers. Nothing beats the tangy Orangey/lemony taste of a Meyer lemon. Last year I saved seeds from one and planted it in the spring. I was rewarded with this little seedling. You can grow one too - no matter where you live.

Look for Meyer lemons in the produce isle and my store has them in a separate area from the other lemons. Meyer lemons are bigger than normal lemons and much juicier.

Save the seeds that you will find near the center of each lemon. Some of them have lots of seeds and some only a few.
Rinse the seeds and allow them to dry. Store them in a little container until ready to plant. I put them in a small pot of regular potting soil, cover with about a quarter inch of soil and keep moist until you see the little seedling. Keep it moist and warm and it should grow for you. Remember these are tropical plants so be prepared to winter them over inside if you are above zone 8. If you are lucky enough to have a greenhouse that's perfect. I have grown several types of lemons from seed and I winter them over in my little greenhouse. One is pictured below. It doesn't get below 40 degrees in there so they make it through the winter just fine. A sun room or brightly lit window will work too.

2 year old lemon in my greenhouse
As you can see in the picture above, my little tree is small but happy in the tall pot I planted it in. As it gets bigger, I'll move it up to a larger container. I'm not sure how long it takes for it to bloom. Probably three or four years - I can hardly wait. My friend bought a tree from a local garden center. It was EXPENSIVE and full of blooms. she said every bloom fell off about a week after taking it home. I think one of two things probably happened; she went from cool greenhouse atmosphere to dry house. A humidifier or steamer may have helped. Some plants simply don't like to be moved and will drop blooms and leaves due to shock. If that happens just water it sparingly and wait. They will usually recover and put out new leaves. Keep it happy and you should have blooms the following year.


Tuesday, February 10, 2015

How to Keep Your Greenhouse Pipes from Freezing


Heat Cable

I hope you didn't do what I did. Last fall I told Bill, "I need to put heat cables around the water pipes in Greenhouse". Promptly forgot about it. Actually it had never gotten below freezing in there. The little heater I keep in there has always kept it above freezing.

Who would have thought we would have sub-zero tempts in Middle Tennessee - for 3 nights straight! Needless to say I had a frozen water pipe at the back of my greenhouse. Our plumber (thank God, he is my neighbor too) just left from replacing that pipe and of course there is no heat cable to be had within 50 miles of here. Good ole Amazon Prime to the rescue! I found and ordered this cable and it will be here Saturday! No freezing weather predicted till then so I should be OK. I ordered the cable long enough to go ahead and wrap all the pipes in the greenhouse - even the ones that didn't freeze.

Another thing I did that didn't help any was put my big container of potting mix against that back wall and I'm sure it blocked some of the heat from reaching those pipes. I have a bigger heater now, no major damage done. Thank Goodness I was not sprouting tomatoes yet!

So learn from my mistake, install heat cables on your exposed water lines and heat your greenhouse if you plan to use it in the winter!