Showing posts with label container gardening. Show all posts

Tuesday, December 22, 2015

MY CHRISTMAS CACTUS - Schlumbergeras - How to have blooms from Thanksgiving til Christmas!

I have pink and red flowering Schlumbergeras. I grown them in pots and put them outside as soon as the spring weather is stable here in Tennessee. I bring them into the house (or greenhouse)  before the first frost. Up until this year they have bloomed at Thanksgiving rather than Christmas. This year  brought my big pink one into the house and put the smaller ones in the greenhouse. The pink one bloomed at Thanksgiving as usual but the ones in the greenhouse are blooming for Christmas this year! 

Christmas Cactus Red Flowers
So now I know how to have flowers from Thanksgiving through Christmas. If you don't have a greenhouse a cool basement or garage will work too. Check them and when they have big fat buds like the one here bring them into the house. These are really not cactus so do give them a drink more often than you would a cactus. As the blooms fade, carefully pinch them off so your plant stays pretty and fresh. When its done blooming put it somewhere near a window or other light source and take it back outside in spring (semi-shaded location) until fall. 

I had several in small pots that I started in spring from leaves, I brought them in and tucked the pots in container gardens that I was wintering over in the house. I loved they way they set off my Angel Wing Begonia!
Potted Cactus in container garden
Christmas Cactus Pink Blooms


Monday, November 23, 2015

My Christmas Cactus Always Blooms at Thanksgiving

Christmas Cactus (Schlumbergera) are readily available in garden centers and big box stores all over the place right now. I love them and they are super easy to grow and propagate.

They come in several colors from white and gold shades to the hot pink pictured above.  The original Christmas Cactus  that this plant came from was purchased at Christmas several years ago. When I got it it was in bud and I enjoyed it all through the holiday season. When it had dropped the very last bud, I put it in a sunny window kept it barely moist and waited until the outside temps were above 60 degrees. I potted it up into a larger pot  and out it went to a shady spot on my porch where it suffered much neglect - intentionally! I watered it when it got wilted or sooner if I remembered.

If you live in a warmer zone than my zone 6B you might get away with keeping yours outside all year. I have to bring mine in before frost. I keep lots of plants over winter in the big sunny windows we built into our art studio and this is where the cactus goes. Within two weeks the buds begin to pop out on the ends of every stem. When I see the first bloom open I put my plant in a showy place in the house . The picture above was made Thanksgiving Day. All my Christmas Cacti have always bloomed on or right after Thanksgiving. They give me much joy!


tiny roots

 
planted back into the pot
When I brought this one in from the studio, One branch was wilted but I noticed roots on all its' leaf joints. I poked a hole in the soil of the pot and pushed the end of that wilted stem into it. It will take root in a few weeks and be a new plant. All one needs to do to make new plants from a Schlumbergera is make cuttings anywhere there is a leaf joint, place the cutting (with or without rooting hormone) into a pot, keep it moist and you will have a new plant in no time at all. If you look closely at your mature plant you will probably see tiny roots growing out of many of the leaves, any of those leaves will root in a pot or tray of soil.

See the little roots here

If you've never grown a Christmas Cactus or you tossed them out in the past because you didn't know what to do with it, now is the time to get started with a new one. I think I might have room for another color myself.


Monday, October 26, 2015

Raised Herb Beds Update

The first season for my raised beds of herbs is almost done. The oak leaves are falling and will soon cover the beds with a warm blanket for winter protection.I wanted to give you an update on how the plants did and what I've learned.

I wanted these beds to be as maintenance free as possible. I only watered them once or twice all summer and we had some severe heat and dry weeks. I think the compost helped keep moisture in the beds. I also did not add any additional fertilizer - again the compost was all the plants needed. Herbs don't need much fertilizer anyway and they like dry and well drained.

Oregano growing under Lavender
The Oregano is the happiest plant in the gardens. It has almost covered the bed where I planted it under Spanish and Goodwin Creek Lavenders. I have dried lots of oregano and will use it in the gift baskets that I make for family and friends at Christmas. I'll post the pretty packaging I make when it is done, Maybe give you a printable label you can use yourself.


Coleus Suprise
I was happy with my little sage plant's progress too and I had this little surprise come up in one of my beds. I'm sure the seeds for this coleus were in my compost.
Sage
 
Some of the lavender plants have done well and some not. the Provence all died. Goodwin Creek is happy and Serenity too. The Spanish lavender is very healthy and full but I will be pleasantly surprised if it survives our winter temps.
Goodwin Creek

Spanish lavender growing around Goodwin Creek
 
The Thymes are holding their own. Honestly, the thyme I planted in large pots seem to do better than ones I planted in the ground. Elven and Wooly thyme are growing well but they are more ornamantal than culinary. I do like them in my rock gardens and they have added interest to my raised beds. I planted Purple Sage late in the season and it is doing well considering the short time it has been in the ground. It should make quite a show next year. To see how I started these beds see my post titled Raised Herb Beds Part 1  and Raised Beds Part 2. Are you growing any thing in raised beds? Post a comment and tell us about it.  


Sunday, October 11, 2015

Benefits of the Backyard nursery


This is my friend Lisa in front of one of her flower beds. She showed up one day in my backyard - literally! I can't remember if it was early this spring or last when Lisa followed the signs to one of my plant sale days. We hit it off right away and spent a lot of time talking plants and gardens. On another sale day, she came at a time when no one else was there and we sat on my porch swing and discussed all sorts of things for over two hours! One of the things on her wish list was a Blue Sky Vine -I didn't have one and had no idea what one was. When she described it to me, of course I wanted one too.

Blue Sky Vine
Low and behold, my phone rang a few weeks ago and Lisa had found a Blue Sky vine! She invited me over to see it and get a cutting. I was thrilled! Not one to go empty handed, I took her one of my Peggy Martin Rose bushes that I knew she had wanted but I had sold out of this spring.

Oh My Goodness! I just thought I had a lot of plants! She will never get all the plants in the ground that she has every where in pots. Pot on the patio, pots in the driveway, pots in the yard! Blue pots, clay pots, decorative pots and nursery pots! I loved the beautiful chaos!


We even walked across the street to her neighbor's to look at a mystery plant that my Back Yard Nursery Forum buddies later identified as a Butterfly Bush Buddleja lindleyana . It looks more like a wisteria than a buddllea. I want one of those too! 


In addition to the blue sky vines, I brought home cuttings of Allamanda vine - they have already rooted and are potted up into gallons, seeds from a cool night blooming plant, lots more stuff! The people I meet in my own backyard are the best thing about my little nursery business! 


Sunday, October 4, 2015

A Quick Tip for Refreshing a Faded Flower Container

You know when I find a good tip I like to pass it on to my blog friends. This one came in my mail the other day and I think it is pretty timely and an easy fix for those faded summer containers. http://www.gardengatenotes.com/2013/09/10/ba-container/?utm_source=GardenGateNotes&utm_medium=email&utm_campaign=7385


Sunday, August 30, 2015

This Bug is eating my plants!

Damaged Hibiscus 
I have searched all my books, the web and asked everyone I know and I have no idea what this pest is but I can tell you what it's doing. It's eating it's way through my garden as well as the garden's of many of my friends and customers! It acts like the rose slug but is eating everything EXCEPT my roses! It's a tiny (almost invisible) Caterpillar on the underside of the leaves and as you can see if left untreated, the leaves become skeletons.

Neem oil and Insecticidal Soap did not work. Neem is what I always try first because it is recommended for organic control. I don't like using chemicals but I also can't afford to lose all my stock plants either. Mimi's Greenhouse Nursery would be out of business without my stock plants for making cuttings and new plants to sell.

After about six weeks I resorted to Malathion spray on underside of leaves. I was careful not to use this around where the butterflies and Humming Birds were feeding.  The before and after can be seen on the two plants below. The top growth is healthy - Finally! If this had only been on a few plants I would have let them be and hoped for regrowth in the late fall but it was all over my plants both in the ground and potted plants - spreading since May!

If any of you have any idea what this pest is, I'd appreciate a comment.
new growth on Hibiscus

Angel Trumpet getting new healthy leaves

Sunday, August 16, 2015

Growing and Propagating Coleus


Coleus "Trusty Rusty"


Coleus are easy to grow and care for. They are not hardy above zone 11 but are so easy to overwinter that it is worth having these beautiful plants as part of your landscape or as container plants.
Coleus are grown mostly for their leaves and will get leggy if allowed to bloom. The newer varieties such as Trusty Rusty above and  Tricolor at left rarely bloom or maybe it's because I keep pinching mine back to make them fuller that they don't bloom. All plants can have color variation depending on maturity, fertilizer, temperature and light. For the most part, coleus with red and orange leaves tolerate all day full sun. Too much sun can cause purple-black ones to fade all over or they may scald (have pale burn spots on leaves). And for any color, too much shade can keep all the colors from coming out. I have some in shade and some in part sun and I haven't noticed too much difference in leaf color. See how pretty Coleus are with these Geraniums in a large pot.


Propagating Coleus is easy! I root mine in water but you can also stick cuttings dipped in rooting hormone in a mix of sand and perlite and they root fairly quickly. Add mist and they will root even faster. I prefer rooting cuttings in water because it takes much less room and trouble. I should call this blog The Lazy Gardener! Here is a picture of Coleus that have been in water for about 3 weeks. See all the roots. They are ready to pot up. If you are growing Coleus in water to winter over, I do this often - no soil just water in a sunny window - trim the roots if they get long and stringy. They will tend to rot and ruin your plants. I add a tiny amount of liquid fertilizer to the water if I am keeping them in water over winter. 
 
So don't let the fact that Coleus are tropical and they do not flower keep you from trying this easy care plant. They are fun and easy and beautiful!


Monday, August 10, 2015

Raised Herb Beds Part 2 or Buy 3 Get one FREE!

Keep reading for a way to get a raised bed FREE! The herb beds I added to my yard for stock plants have been filled with compost and were ready to plant. I wanted a unique way to separate my herbs in each bed. I love rocks and my mom has a big creek on her property with wonderful sand bars and rocks! I bring home rocks every time I visit her. Bill's favorite comment when I return is, "Oh, I'm so glad you brought home more rocks!". Of course, he is being facetious - he doesn't get it at all.


Anyway, I went through my rock collection and selected some small to medium stones to divide the beds into sections. I planted one or two herb plants in each section.  I even planted a sedum in a depression in this mossy rock.


Here are a couple of my favorite beds.

Sage, Lavender and Thyme in a sun burst shape
Oregano and Lavender in cross


I had 3 more beds to assemble. I wanted these behind the greenhouse to use as storage for Hosta and other plants that are in the growing process. I am also going to use PVC pipe to make a mini hoop house over these for wintering over outside. I'll cover the hoops with frost blanket material this winter. More on that when the time comes. These beds are the picture at the top of this post. Meanwhile, I discovered a very cool thing; by assembling three of these kits together like the black lines below, you can add a forth free using the two sides left over from the places circled in blue where you didn't have to use the additional side from a kit. The green lines show where to place the left over boards! In the photoat the top, I have the first two beds in place and will add two more sections this fall.
Free bed is indicated in green


Monday, August 3, 2015

Raised Herb Beds Part 1

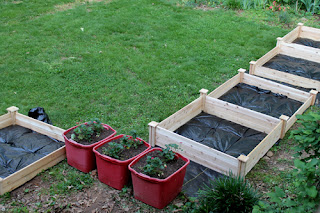
I added raised beds this spring to contain more herbs. I needed places for my stock plants from which I take cuttings for propagation. I found these cedar 4x4 foot beds at Home Depot. One was simply a 4x4 by 8 inches deep and the other was 2 4x4' beds - one 8" deep and one 12" deep - and they can be attached together or used as separate beds. I bought all they had left in stock and found 3 more at my local Ace hardware. Very simple to assemble and I think Bill can make these from scratch next year. Pressure treated wood will work instead of expensive cedar wood.

Here is detail of parts and assembled corner.

Here are the beds assembled and in place. The red containers are from last year and contain ever bearing strawberries that I wanted to leave in place.

 Next I had to kill the grass in the beds. I put down black plastic, pinned it with landscape pins and  waited about 3 weeks for all the grass and weeds to die. The hot sun helped speed up the process.
Now all I had to do was remove the plastic (water would drown the plants if I left it in place) and put in soil. I used compost to fill these. See my terrific compost bin in this post: http://www.tipsforgardeningonline.com/2009/04/best-ever-compost-bin.html

You would not believe the tomato plants that came up in that compost after about a week! Seriously, there were hundreds! I left a few of them and the picture is at the top of this post along with the giant gourd that also self seeded.

Next week I'll show you all the finished beds and some unique money saving ideas I had about using more of them.


Sunday, August 2, 2015

Best Herb Tips Ever

I have grown and sold herb plants, dried and fresh herbs for years. When I received this blog post in my email boxthis week, I knew I needed to share it with my blog readers. This is the best information on growing, using, preserving herbs I've read in a long time. It should be no surprise that it is from my Internet buddy Mike McGroarty from Freeplants.com written by his son, Dustin and no, I don't make any money from referrals!  I hope you learn a bunch from it!

http://mikesbackyardnursery.com/2013/07/how-to-grow-herbs-at-home/

Friday, July 31, 2015

Growing Vegetables in Containers Revisited


I think I should rename my blog "Rainy Day Gardening" I can't seem to get out of the garden long enough to write unless it rains, something that has not happened much around here in the last month but I gratefully woke up to thunder and rain this morning.

If you read my post about Fool Proof Container Gardening you will know exactly what I am addressing here. If not, give it a read. I've learned much more about growing veggies in these little containers and have changed how I am going to do it next year.

First I wondered if it was really necessary to add all that shelving and drainage etc in the bottom. I am all about simplifying my life and saving time as well as money. If I could drill a few more holes in the side of the containers (about 3 inches up from the bottom) I figured I could put the PVC pipe in to add water to the bottom, fill that container with soil, add my fertilizer layer, finish the fill and plant. The drain holes would allow excess water to drain out but still leave water in the bottom for the soil to wick up. I tried it and Wala! This worked as well as the ones I spent hours building!

An extra plus for my new idea was no mosquitoes. I discovered that mosquitoes loved the standing water in the old containers and I needed to add mosquito dunks to the pots to kill the larvae. I just dropped them down the PVC pipe.

I also ended up taking the plastic off the tops of all my containers. I think it was adding too much heat and causing my plants to wilt from that heat. Next year I'll skip that step also.

Lots more plants would fit into one container than I originally thought. Here is one with a tomato, basil, 2 egg plants, squash and pepper! All happy. See my little egg plant fruit.

Another lesson learned: I assumed - never do that by the way :-) - anyway, I assumed that by having my plants up off the ground I would not have a problem with insects that have larvae in the soil. Wrong! I got squash borers in my lovely yellow squash plants just as they were beginning to bear fruit. I immediately slit the top of the stem where the damage was and removed those bad boys. I then buried that wounded portion of the vine so it could make new roots. this is not always successful because one never knows for sure if one has found all the borers, I was blessed because all my vines but one survived and are busy making little squash casseroles for me.

To prevent borers in the cukes I just planted, I placed aluminum foil around the plants when they were about 3 inches tall. I read this confuses the moth and prevents it from laying the eggs that make the nasty things in the first place. The jury is still out on that one because they are not big enough yet to harbour the critters.

All things considered, I am very happy with my containers and will certainly add more next year. I did find that the ones I placed beside my house on the southwest side did much better than the ones that did not receive as much sun - pretty much a no brainer. I did have to move the containers away from the house a little 'cause my light colored siding was putting out lots of heat in the late afternoon - wilty plants!

Another little tidbit: I gave up trying to get rid of the mildew. the natural mildew treatment did work but mildew would come back somewhere else in a few days. I blame it on our terribly humid summers here in Middle Tennessee. It did not seem to hurt the fruit production just made the plants look bad.

About that fertilizer layer: I used 3 months timed release. I needed to fertilize the containers in early July because my 3 months were up. I just sprinkled it right on top of the soil. Everybody seems to be happy and productive now.

I'll be adding new containers for peas, winter squash and more salad greens soon. I have all sorts of containers in my yard. Look at how great the basil and peppers are doing in this pot.

Next year I'll start my tomatoes early in the greenhouse and grow everything on that southwest location or beside my deck where the suns shines until about 3 PM.

Happy Container Growing!

Saturday, July 25, 2015

Fun Gardening, Cooking and Craft videos!

OK I'm guilty. I spent way too much time today on Youube. But  it is a Saturday morning after all - or was when I started! LOL!

Here are a few awesome tips I found there.


and one more...these girls are sort of silly but it's a cute idea.


Friday, July 3, 2015

Garden Container from Reclaimed Pallets


My co-worker's son Jeffery Davis has a real informative web site. Jeffery gave me permission to post a link to a cool article about how to build a nice garden container (a big one) from used wooden pallets. Jeffery's site is about green living but not over the top or "green washed" like many of these sites are..

Here's what Jeffery says about living green, "The good news is you don't have to be viewed as a weird tree hugger by all your friends in order to live a green(er) life. Likewise, you do not have to empty your bank account, covering your roof in solar panels, installing components to harvest rainwater, or build a new house out of hay bales." He believes that every little bit helps, I agree. Do what you can to be a good steward of what God has given us. Here's the wooden pallet instructions.

Saturday, June 27, 2015

We Love this Re-purposed Flower Container

Tad has outgrown his "turtle sandbox" and I couldn't bare to toss it out. Since it was located at the edge of my garden behind the fence. It's the one I like to call my secret garden even though everyone who comes to a plant sale sees it. Anyway, It was the perfect place for a little rock garden. All I had to do was mix some potting soil mix into the existing sand and it was the perfect mix for sedum. I planted several kinds among the stones I had gathered the last time I went to mom's creek. The center seemed a good place for a strawberry crock full of Hens and Chicks.

We all loved it - even Tad, Well, after seeing it all fixed up different, he did want to run his trucks around in it one more time... no no!

Sunday, June 14, 2015

Pest Watch and More Container Gardening


The methods for saving my squash from the squash borers and mildew that I mentioned in my last post seem to be working. As of today, I have no signs of stem damage and the mildew has not shown it's ugly face! You can barely see the paper collar around the stem of this squash plant. I have small squash and tiny tomatoes in my containers.

I tried snow peas this year and low and behold - I have peas! I really didn't think this would work but we have actually eaten fresh peas twice already. I'll do this again next year; might add an extra container just for them. As you can see, I have a yellow salad tomato plant happily growing among the pea vines. It's what I love about container gardening, I can crowd lots of plants together and they all are happy as long as I fertilize and water.


Sunday, May 10, 2015

Growing Mint in Containers


If you want mint for your garden there are a few rules you need to know.

Rule #1. Grow in in containers
Rule #2: Never let it escape from the container
Rule #3: If it does escape - pull it up immediately!

Do you get the point? Mint of all sorts are invasive! BUT... they are also wonderful additions to your herb collection too. The container above is Chocolate Mint with an Apple Mint in the foreground. I must  admit I broke the rules with the apple mint. This particular location has heavy clay soil and I wanted a tall plant to disguise my pond filter. The heavy clay keeps it from spreading as profusely as it would in good garden soil and it is easy to pull up shoots that wander from the location. I have a friend who wanted mint to plant in her yard. I warned her that it would take over. She said that she didn't care, she lived way out in the country with no close neighbors and she loved the smell of mint when she mowed the yard.
sweet mint

Here is Sweet Mint just peeking out from it's winter sleep. This container is on my deck. It's close enough to the kitchen to clip fresh for my iced tea, potato dishes, salad and lamb - even sweet peas are good with mint.


New for me this year is Moroccan Mint that I bought to sell at Mimi's Greenhouse Plant Sales this year. Of course I'm putting some in my new herb containers to propagate for next year and enjoy this year myself!

Moroccan Mint
Another new one is this pretty Grapefruit Mint. I have another Grapefruit Mint that is fuzzy like the Apple Mint in the top picture. This one has a nice purple tinged leaf and a yummy  flavor - not quite as tangy as the Lemon Mint that has long been one of my favorites.


I personally think mint is worth the trouble of keeping it contained - so good in recipes, wonderful to brush by it in the garden and enjoy the fragrance and attractive foliage and flowers too.