Tuesday, March 31, 2015

Recession gardening, survival farming and other Memorabelia

I inherited my green thumb from relatives on both sides of my family. As far back as I can see in our family tree we were farmers and gardeners. I remember helping both my grandmothers work in their flowers and their vegetable gardens. My maternal grandma, Nannie, taught me how to pick, fry and eat squash blossoms - yummy! I remember watching my paternal grandmother, Ma Meadows, dig a new flower bed around her foundation and fighting the brown snakes that were abundant there. I still don't like snakes!

My dad was an avid journal writer. He is gardening in heaven now but I can look back at his journals and see what he planted, what the weather was and what he and my mother did on any given day before he died.

I begged him for years to write down his childhood stories - you all know the ones I mean - the ones told at family gatherings, those word of mouth family histories that are passed down verbally and usually are lost after the old folks are gone. For my fiftieth birthday, he gave me 350 handwritten pages of those stories. He wrote how his family farmed, discribed the farm equipment, talked about his dog, Ring, and his cousins and friends. He told funny stories about Halloween tricks and how they all lived through the great depression and World War Two. I shared the book with friends and family and to a person, they all loved the stories and urged me to publish them.

I finally did and everyone who has read Dad's stories about farming, family and growing up in the country and small towns in the south, have wanted a copy for their children or parents. One friend bought copies for her school library, others have read them to their children., they especially liked the story of Daddy's dog, Ring.

If you would like a copy, the book is called Papa's Journal by Robert H Meadows

Seed Starting 101


It’s that time of year again. I’m getting “what do I do now that I have my little seedlings” questions from friends and family. Since I started this blog to share what I’ve learned along the way and hopefully others will chime in via comments, I’m posting how I deal with seed starting and transplanting.

Seed Starting
There are probably as many ways to start seeds as there are kinds of seeds. I will only cover 3 of them here; under lights, winter sowing and direct sowing.
I have an earlier post about winter sowing and will only add a footnote here. My winter sown seeds sprouted at about the same time as the ones that I panicked and started around March 1st under lights in my basement. The pictures here were made on March 14th. Basement ones took from one to two weeks to germinate and honestly, I will probably not do winter sowing next year because the basement is faster and I am impatient. If you don’t have the space and don’t want to look at the light shelves in your house, winter sowing is the way to go.

Under lights: I use the seed starting flats with the plastic “greenhouse” tops. I save these year to year, even the liners that hold the seeds. I wash these out with a mild bleach solution before I store them to keep from spreading fungus, etc. Here is a picture of my shelves that Bill made for me out of PVC pipe. I store it in the basement but you could actually take it apart and store somewhere until you need it again. The plans were from the very first issue of Garden Gate Magazine. If anyone is interested, i might post the plans. I have built a couple of these over the years and they work great. I use cheap shop light fixtures with one warm and one cool spectrum florescent light tubes in each fixture. Hang the lights as close as possible to the sprouts and gradually raise them as the plants grow. I usually take the greenhouse tops off when my plants have one set of true leaves.

Direct sowing: If you have the patience to wait until a couple of weeks before your last frost date, you can sow your seed directly in the garden. Some seeds can only be sown this way. Carrots for instance, don’t transplant very well – read your seed packet for information about this. Cool weather crops like lettuce, spinach, radish, etc. will do well if sown as early as late January or February here in zone 6b. I planted lettuce in big pots on my deck this year in late January and today (March 31) I have pots full of inch tall seedling out there. Again the back of your seed packets will give you all in the information you need for this.

Transplanting
When your seedlings (planted inside or winter sown) have their second pair of true leaves, I will carefully pick them out of the seed trays, A kitchen fork works well for this, and pot them into 3 inch pots. As soon as the weather warms up to around 50 degrees I start hardening them off by placing them outside in a shady place a few hours everyday and after about a week of this, I move them into the sun for a few hours each day. Don’t let them dry out but don’t drown them either. Evenly damp is good. Also, take them in each night in case of a drop in temps below 40 or worse - a surprise frost. As soon as your last frost date – here in Mid Tennessee, it’s April 20, you can plant them in their permanent place in the garden. I have found that my plants do much better if I harden them off. There is much less rick of wilt than if I take them directly from the flats to the garden. I remember my Dad’s tomato plants in their little pots all lined up on the front porch rail every day and setting on the floor inside by the door at night.

Maybe this will help those of you who are first time gardeners or first time seed sowers. Anyone out there with additional information please chime in.


Soil Testing


It's no secret that Colorado gardener's have some tough soil to deal with!  But don't let that slow you down, because our hardgoods experts give us several ways to test and amend your soil, to make a blissful home for your plants!
Soil pH is one of the most important factors influencing your gardening success, because it affects the availability of nutrients to plants, as well as the microbial activity in your soil.  No matter the quality of the fertilizer or supplement you apply, the plant can’t use it if the pH is too high.  Soil pH is a measure of the acidity or alkalinity of a soil. On the pH scale, 7.0 is neutral, above 7 is alkaline, below 7 is acidic. Bleach for example is very alkaline. Lemon juice is very acidic. Most plants prefer a pH of between 6 and 7. Our soils are typically 7 or greater.

There are several ways to check your soil pH. Home test kits are a quick and relatively easy way to get a reading on pH. Soil test meters are an economical way to test pH. A meters lets you test your soil in multiple locations (yes, it can vary greatly across the garden), quickly and easily. Meters come either with a digital or an analog readout. You don’t have to mix anything and you can do the test as often as you like in a short period of time.  There are also kits which utilize a capsule system to accomplish the test. You combine soil, water and a test capsule in the test tube provided, and then compare the color with the included chart to get the answer. You can buy test kits specifically for pH, or kits that include pH plus Nitrogen (N), Phosphorus (P) and Potassium (K).


Home test kits are easy and handy, but to get a more complete understanding of your soil, we recommend you get a soil test analysis from the laboratory at Colorado State University. You can get a mailer and test instructions in the Hardgoods section of the store. The mailer is free, but you do pay a fee to CSU for the test (around $30). You will receive  a comprehensive analysis of your soil.


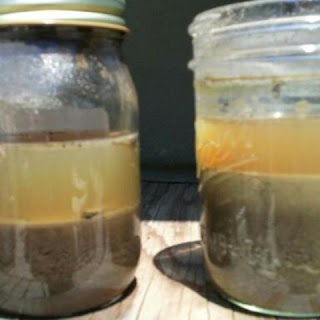
Here’s another quick test  for you to determine the makeup of your soil. You need a mason jar, some dish soap and water. Put a cup of the soil you want to sample in the mason jar. Add 1-2 cups of water and ½ tsp of dish soap. Shake well and let it sit undisturbed for 24 hours. You’ll see that the soil has settled into layers. The first layer will be sand. The second layer will be silt and the third layer clay. Organic material will float to the top. Calculate the percentages by volume to see what your soil structure is made up of. For example, If you have equal parts sand and silt with a smaller layer of clay and some organic material floating on top, your soil would be 40% sand, 40% silt, 20% clay. Most of the time, you’re going to see a small amount of sand and silt and a large percentage of clay.

When you’re testing, bring the results in to the store. Depending on the outcome of your tests, we’ll be glad to make recommendations for products to help correct the problems you have. 

Sunday, March 29, 2015

Solve Your Bug Problems withThese Tips

Squash Borer - Gross! 

Last year the squash borers got my squash and the squash bugs got what the borers left! I found the perfect solution in daddy's notes. He said, "Plant radishes with cukes, melons and squash. Mennonites said this would work for borers and bug problems. I did it and had no bug problems! Radishes & Marigolds work wonders for bug's." I'm for sure going to try this this spring.

Dad always tested the germination rate of his seeds. To be sure the seeds were good he would wet paper towels, place a few seeds (be sure to label what they are) on a towel, fold it over the seeds and place in a baggie. Check them in a few days to see if tiny shoots are coming out. If so, you know your seeds are viable. If no sprouts in a week or so buy new seed. Better than planting a garden with seeds that will not germinate.

About Turnips: Papa said Sept 15 was perfect time to plant them in our zone 6B. No bugs by planting them this late. He had best success by planting in rows rather than beds. First harvest was Oct 15. Need to thin the plants and eat the greens in order to get nice turnips later in season.  Harvested good turnips in December and still had turnips to eat after a hard freeze took out the green tops. Roots stayed good in ground even after hard freeze.
rooting in water

My grandma always started her sweet potatoes in the kitchen a month or so before the first of May. They will form roots in water and all you need to do is cut out the plants (each potato will produce several vines) and plant them in your garden. Be sure to till the soil until it is loose and fluffy. I've grown pretty good potatoes by continuing to pile on straw as the vines grow bigger, All I needed to do to harvest was remove the straw!

sweet potato in water


 Next week: The Best Gardening Advice Daddy Ever Gave Me!


Saturday, March 28, 2015

How to Keep Deer from Eating Your Landscape

Deer have adapted so well to suburbia that they have become a nuisance and are destroying our landscape. Yes, they are beautiful and we sometimes enjoy watching them but who can afford to replace expensive landscapes because the deer have eaten it to the ground? One year they ate all my mature Hosta that I had painstakingly moved from my former home. I planted Anise Hyssop around my beds and discovered that the deer hated it! Now I have beautiful hosta and no deer! Below is a list of plants that deer will avoid. It came from my favorite gardener Mike McGroarty and his daughter, Amber with a few additions  from me.

Here’s what we know about deer dining habits:

  • As much as 90% of their water requirements are met by munching on lush greens and tender young, plant growth. 
  • Deer prefer high protein crops such as peas, soybeans, turnips, alfalfa and corn.
  • They like trail mix. Fruit, nuts and seeds are especially important when the green vegetation starts to dwindle. Corn that you may put out for birds attract deer too.
  • There are very few animals that can resist the sweet smell of apples. Deer are one of them.
  • They will happily rip off the bark of maples, aspens and dogwoods. They get water from their bark and it sits heavily in their four-chambered stomachs, keeping them full longer.
  •  Now what do they avoid?
  • Deer are sensitive to smells and most strong scents can drive them away (unless that smell is apples!)
  • Like small children, deer don’t like strange textures in their food. They prefer not to eat things that are fuzzy, prickly or thorny. (They do like roses though. I guess in their case, the thorns are worth the taste of the delicious flower.)
  • Deer avoid plants with milky sap and other plants that will upset their stomachs or give them heartburn.
  • Deer prefer not to walk through sharp ornamental grasses or thorny brush to get to food.
  • Deer avoid the prickly center of zinnia flowers

Okay, now what do they NOT like to eat.
There are a variety of beautiful flowers, shrubs and trees that we can plant in our yard that deer are unlikely to do much damage to. This list is based on information collected from searching educational web sites, retail and wholesale suppliers’ recommendations, public forums and personal experience.
These are divided into two categories: one: plants that deer generally dislike eating and two: plants that deer really dislike eating

Generally Dislike Eating
Bee balm
Buckthorn (Rhamnus)
Calla Lily
Columbine
Coral Bells (Heuchera)
Echinacea (Coneflower)
English Lavender
Evening Primrose
Gladiolus
Lily Turf
Oriental Poppy
Parsley
Rose of Sharon
Rudbeckia (Black-eyed Susan)
Sage (Salvia)
Smokebush
Speedwell
Weigela
Yarrow
Zinnia

Really Dislike Eating
American Holly
Anise Hyssop
Arrowwood Viburnum
Barberry
Bayberry
Bleeding Heart
Bluebell
Blue Fescue
Butterfly Bush
Catmint
Common Boxwood
Dwarf Alberta Spruce
Foxglove
Germander
Hummingbird Mint
Iris
Japanese Blood Grass
Lamb’s Ear
Lavender
Lily of the Valley
Lungwort
Maiden Grass
most herbs
Oregano
Poppy (note: Oriental Poppy fit in category one)
Purple Moor Grass
Red Hot Poker
River birch
Rosemary
Russian Olive
Russian Sage
Snap Dragon
Switchgrass
Thyme
Yucca

The Design Process: Bubble Diagrams

This is an interesting video on the design process.  The thought patterns that go into designing a space.  In this case a house, but we use exactly the same bubble diagram/ function diagram process for designing outside space.

The Design Process: Bubble or Functional Diagrams

Friday, March 27, 2015

Former student Mel Jolly, wins BBC Gardeners World Design competition

By Mel Jolly Garden Design
See NS&I Competition Details

My design provides a practical space for every stage of growing food in the garden – seed tray for propagation, cold frames for the more tender plants, the main growing beds and upright support for climbing plants right through to a compact composter in the small storage area to recycle unwanted parts of the plants. In a time where convenience seems to be paramount to people’s lives I feel this design brings together this convenience with a more old fashioned but increasingly popular pastime of growing our own food. It also brings in a social aspect with a bar table that can not only be used for potting and working but also for eating some of the produce grown.

The main features of this garden are the central multipurpose table and the large curved boundary wall. The table is divided into sections – half of which is a storage compartment for all the tools needed and a small composting bin. This can be screened off and locked by a concertina type door. Quarter of the table can be used as a bar area for working and eating. The remaining surface of the table has a seed tray incorporated into it. Below the seed tray the table is screened off with glass to provide a cold frame. The curved wall will be painted with blackboard paint to keep a regular maintenance schedule for work in the garden and joins onto a lower wall with more glass cold frames.

Most of the material used to construct this garden is timber. Timber is extremely durable and if properly managed potentially indefinitely renewable. All timber used will be sustainable timber with the internationally recognised Forest Stewardship Council (FSC) certification. I have used very little hard landscaping –most of the ground surface will be pea shingle to give a sustainable drainage system. SuDS. If money allows the large wall will be constructed in such a way as to harvest rainwater for re-use in the garden. The garden contains a small compact compost tumbler.

I believe my design provides an organised, practical and aesthetic place to grow food. Allotments and growing at home have taken off in the past few years but there are still many people who have the will to grow their own but not quite the way. This is often because they don’t quite know how to go about it or don’t have much time. My design is compact and everything is on hand. Also because it has a good space for sitting it means some jobs can be done in a very relaxed and social way in an ‘around the kitchen table’ kind of way. It is also a place for relaxing in a beautiful space not just for working. The ground pattern is not traditional and I think it is good to show that growing food doesn’t have to be ‘allotment’ in style but plants can really be grown in such different ways. The design will be chic, but not at the expense of sustainability or practicality which will still be paramount.

Plants:

The plants I have chosen are all plants that would usually be either sown, planted or harvested during May and June. They are also varieties that I feel are popular and commonly eaten, especially salad foods and fruit. From a design point of view many of the plants have red colourings which I believe will look stunning as well as taste delicious.

Award Winning Australian Design

Garden design, Courtyard, contemporary, raised planters, water feature, modern design, landscape design,This multi award winning courtyard designed by Cos Design, transformed what was a tired, old unused space into a stylish and functional outdoor room. A three level water feature hides the courtyards rear access, while custom built in bench seating and furniture, built in BBQ, raised planter boxes and screening bamboo planting, provide the aesthetics and functionality required by the clients.

The internal light well is also a feature from the bathroom window and stairwell. This garden was the winner of the 2009 National landscape of the year (Under $100k) along with 3 state awards.

[photography by Tim Turner as featured on Designhunter]

Garden design, Courtyard, contemporary, raised planters, water feature, modern design, landscape design,

Garden design, Courtyard, contemporary, raised planters, water feature, modern design, landscape design,

Garden design, Courtyard, contemporary, raised planters, water feature, modern design, landscape design,

Garden design, Courtyard, contemporary, raised planters, water feature, modern design, landscape design,

Garden design, Courtyard, contemporary, raised planters, water feature, modern design, landscape design,

Thursday, March 26, 2015

Sedum are EASY to Propagate!

It was time to move my sedum plants outside for the summer. They were wintering over in the sunny studio window. One was in a fairly large and heavy bowl. For that reason and the fact that I am pretty lazy too, I hadn't picked it up all winter. When I got it out of the window, look what I found! Leaves had fallen off and gone unnoticed. It's a good thing too because I'm sure I would have either tossed them or tried to bury them to root. Left alone on the window sill they had grown baby plants! How simple is that?

ARCTIC ICE AT RECORD LOW

seaicearea_09_21_1979_flat

seaicearea_08_26_2012_flat

Last year NASA released these rather shocking satellite images of the polar ice caps. According to its scientists and researchers at the National Snow and Ice Data Center, the area of the arctic ice sheet fell to a record low in August . And it is expected to continue to retreat over the next few weeks.

The extent of the arctic ice sheet grows during the winter and shrinks during the summer. The first photo above shows the total extent of the ice sheet’s retreat in the summer of 1979. The second shows its retreat so far this summer. The orange line shows the average minimum ice cover from 1979 to 2010.

According to NASA, the seasonal minimum area of the arctic ice sheet has gotten 13 percent smaller each decade for the past three decades.


Wednesday, March 25, 2015

Free plant Saucers


I am all for saving money and recycling so I look for ways to reuse lots of things around my house. I like the clear plastic plant saucers that are available at garden centers. I put stones in them and use them to supply moisture to my orchids and other plants that like it humid. The other day I bought chicken wings at the grocery and they came in this plactic container.
I used it to make two nice saucers for my plants. Here's how I did it.


1. Cut the top and bottom apart.
2. Remove the label. I did this with Orange Oil. Trim any hinges and closers off.
3. TaDa! You have two new plant saucers for free!


Tuesday, March 24, 2015

Critters!!

 Of course you can always come in to The Flower Bin for plants, gifts, tools and fertilizers, but did you know we carry critters?  That's right, we carry Natural Pest Controls by Orcon.  A lot of people don't like to use chemicals in their yards and gardens and choose to take a more natural path.  You can do this by using live, natural pest controls instead!  In our hardgoods department we have a whole section of critters.  Learn about them, and what they can offer you:


Ladybugs!!
A lot of people in Colorado release ladybugs to take care of a number of problems.  One of the things that they do best is eat those nasty aphids!  They take care of a lot of small insects such as aphids and mites.  We carry the live ladybugs here at The 'Bin by keeping them in the refrigerator so that they stay dormant.  Here are some tips for how to release them in your yard.  To start with you want to keep them in your fridge (not freezer) until you are ready to release them.  First, you want to prepare the area where you are going to put them.  You want to water down the plants in the area so that the ladybugs have plenty of water. You also want to release them in the evening, and also release them at the base of a plant or tree.  For best results release about half of the bag, and put the remainder back in the fridge.  Release the rest of them in a week or two.  We also have ladybug houses to make the perfect habitat for the bugs.  In addition to this we carry something called ladybug attractant.  This does a number of things including: keeping the ladybugs you release around, attracting other ladybugs to the area and attracting other beneficial insects to the area such as lacewings.


Praying Mantis!!
Praying Mantis are used to get rid of a number of large insects including flies, grasshoppers and moths.  They  are sold in a cocoon  which makes it even more fun, because you can often watch them hatch!  Once you put the cocoon in a sunny and warm area it will take several weeks for them to hatch.  Once it does hatch, dozens of Praying Mantis will come crawling out.  These little guys mature pretty quickly and grow to a size that is perfect for praying on large insects.  These are very graceful, cool creatures to find walking about your garden.


Masonary Bees!!
We sell bees!  The bees come in a small straw that sits in the refrigerator to keep the bees in their dormant state.  There are six bees to a package.  What are they for?  Pollinating!  Pollinators in Colorado, and all over the country are at risk.  Their loss of habitat, mixed with heavy pesticide use means that there are less and less of these beneficial insects every year.  By releasing these bees you are helping yourself, your neighbors and the greater food supply.  As an added plus, these type of bees don't have stingers...so you don't have to worry about them being pesky.  We also sell a pretty neat bee house to both keep your bees around and attract others.


Nematodes!!
Nematodes are microscopic worm-like critters.  They are for indoor or outdoor gardeners and they live in your soil.  They are perfect for eating the gnat larvae that may be lurking below the surface of the soil in either your houseplants or your outdoor gardens.  As with the other beneficial critters we keep these guys in the fridge to make sure they stay fresh and dormant until they get released into your soil at home.


Red Wigglers!
Every gardener should know that worms are your friends!  They serve many purposes and are of course very self-sufficient.  We sell them here at The 'Bin in a tub of 200 Red Wigglers.  One of the things a lot of people use them for is composting.  They help break down that compost pile or compost bin faster.  Another vital thing they do for gardeners and homeowners alike is improve the quality and health of your lawn and garden.  Lawns need to be aerated and worms help to do this by loosening up the soil and allowing roots more space to grow.


As always, if you have any questions or concerns, don't hesitate to ask our hardgoods experts today!

Enjoy the critters!


Hummers are scouting


A real quick hint. My husband saw our first Hummingbird this weekend. It was looking for our feeders - of course, I hadn't put them out yet. I scurried around and mixed up the sugar water (1/4 cup sugar to 1 cup water) and put out feeders. I haven't seen another one but it might be a good idea to get your feeders out now. Sugar water is cheap and those little scouts may be in your neighborhood searching right now!

Is it time to put some grass seed down?


Spring is a good time to rejuvenate your lawn by adding grass seed to repair bare spots or to help thicken up a thin lawn by over-seeding. Most of our lawns are Kentucky Blue grass or combinations of Kentucky Blue grass, Perennial Rye grass and fescue. These are cool season grass seeds, meaning they are best sown now in March and April. Warm weather grass such as Buffalo grass should be seeded in May.
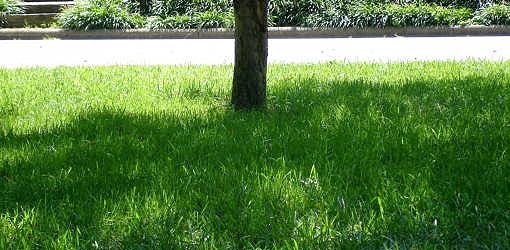
Selecting the right seed depends on whether you’re lawn is sunny, shady or a combination of the two. Since we sell seed in bulk, we can help you select the right seed combinations for your particular lawn condition. Flower Bin Blue is a combination of blue grasses designed to be drought tolerant and hardy in sunny locations.
Colorado Complete is a combination of blue grass, perennial rye and fescue meant to be used in sunny and partial shade conditions. Colorado’s Own is our best seller. It will blend in with most lawns in our area. Emerald III is the grass seed to select for shady areas. Really, the most important question of all is the quality of the soil under your grass, because your turf grass will only be as good as the soil it’s growing in.

For repairing small areas in your lawn, you can work some organic material such as Sheep, Peat and Compost into the spots to be fixed, add grass seed and cover lightly with compost or peat. For large areas, or for over seeding your lawn, have the lawn aerated, then add organic material and seed.
Core aeration involves using a machine which extracts a plug from the lawn, which helps reduce thatch, improves soil structure and in general opens the soil so that water, air and fertilizer get to the roots.  After aeration, leave the cores in place. They will break down over time.
Next, add some organic material over the entire lawn. This is called top-dressing and as the organic material works its way into the soil, it helps break up the clay and improve root structure. Stronger roots mean a more resilient lawn, especially in the summer.  Over-seeding is when you apply extra seed to thicken your lawn. It’s a good practice to over-seed your lawn every three or four years.  Another improvement you can make is to add Soil Activator, a granular humic acid applied in the spring and fall to improve soil structure, strengthen roots and increase microbial activity. Soil Activator can be applied more frequently if your soil is heavily compacted. If you have questions, stop in. We’ll help you decide what the best choices for your lawn.

Sunday, March 22, 2015

On the Land


We have spent the last week getting to know our land and preparing to work it.


A friend offered to plow some ground, and I seeded some peas.

I also started the huge job of pruning fruit trees.


This apple tree that I started on is one of several that needs a major overhaul.  Look at what a fabulous climbing tree it is.  My granddaughter loves to sit in it.


It overlooks the pond, another of the grandchildren's favorite places to be.


Actually, it's a favorite place for me, too.  The ripples are from me wading along the edge.


We are not living there yet because we have no electricity or sewer, but we do spend most of our time there and love every minute of it.  Bruce is spending hours soaking up the sunshine while getting things done.
The perfect way to spend a great spring!

Growing Carrots - Tips from Papa's Garden Journal


Papa grew the best carrots ever! We had them from summer till way after Christmas. Below are tips from his journal about how he did it.

Papa always planted Nantes Coreless seeds in the fall. Here's what he said in his journal about growing them: "8-2 Planted 1/2 pack (same as last year) where potatoes were - ground very fertile and loose due to pony poo and straw. 2 rows.
8-9 Carrots coming up, removed straw and mulch
9-27 Some as big (around) as pennies - very good stewed. Lots and lots. Too thick still
1-1 (following year) lots and lots: smaller than usual probably due to them being planted too thick but some very large, most OK. Still have one full row in ground. they are mulched.
1-29 dug 2 large plastic dishes full - the end of the crop.

Another year he wrote this: " Carrots- Nantes - 2 rows where potatoes were. Started eating some end of Sept. When we returned from trip 12/3 (he and mom always went to Gulf Shores for three months every fall) they were monsters! a bumper crop of long, large, smooth ones. I gave carrots to everybody and still had scads for us.
12-21 mulched remaining rows with straw due to cold
March 1 final digging - an aluminum dish pan full after eating them since September, giving them to all our friends. Much too many - cut back to one 40 foot row this year.

Dad always mulched the carrots with straw before the first hard frost. He always planted his carrots after he dug the potatoes and raked the bed smooth. One of his favorite sources for seeds was Henry Fields . I lived on the adjoining property to mom and dad and we raised ponies. That's where he got the pony poo. He would till in the year old manure every spring and his garden soil was very fertile and fluffy too.

I think I will plant carrots this fall in my deep tubs. I don't have a normal garden due to my nasty clay soil and huge, tall oak trees. I use raised beds and plastic containers. See my post about container gardening.

 Next week a mishmash of tips about lots of things from Pop's journal.

If you want to read more about Papa and his antics check out Papa's Journal.

Saturday, March 21, 2015

First Day of Spring in Tennessee

First day of spring was bright and sunny with a little nip in the air. Never the less, I ran around the yard to snap a few picts of some of my favorite spring blooms.


Even the fish were happy!